-
Building a 1/2 lb air coffee roaster for 50 quid!
This post is about building a bare bones DIY fluid-bed coffee roaster with a decent batch size for around 50 pounds uk (around 50-60 dollars US).
I recently discovered you can find cheap heatguns with variable dialled temperature from sellers on amazon and ebay. The variable heat control really lowers the barrier to DIY roasting because you gain precision without having to resort to electronics and soldering. This lead me to wonder just how cheaply you could put together an air roaster based on one of these.
The entry level for diy air roasters has traditionally been a popcorn maker (I previously built one here). Unfortunately the coffee capacity of a popcorn maker is confined to around 85g-100g because of the limited fan motor and element. The modifications are also quite involved if you want individual control of the heat and fan speed.
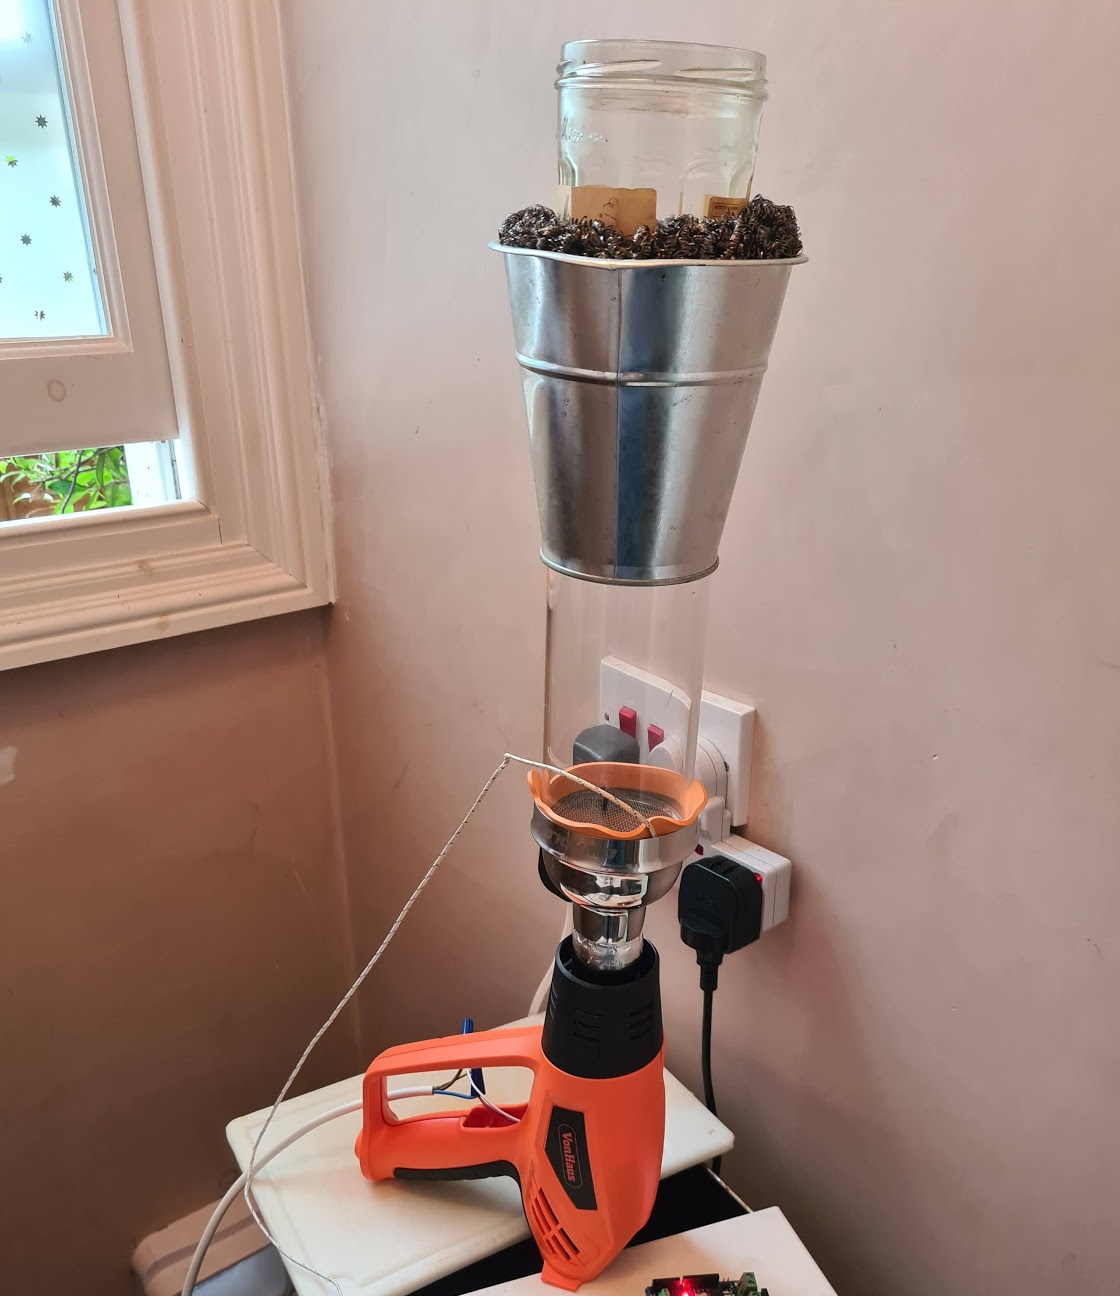
Instead here I’m following the simpler heatgun + air blower route. To keep costs as low as possible I built the rest of the roaster prototype out of tin cans, cardboard and tape. Here’s my prototype roaster in action. If you listen you can clearly hear first crack:
Building a coffee roaster out of bits has some nice advantages over buying one:
- The initial cost is low
- There’s lots of scope for cheap incremental upgrades: temperature probes, glass chamber, venting, automation
- Maintenence is straightforward: the individual parts are cheap to replace if something breaks or wears out
- It’s a fun hobby
Also fluid bed style roasters have a couple of nice benefits for the home user:
- The air stream forces chaff and smoke out through the top, which makes it straightforward to filter and vent smoke out a window if you’re roasting inside
- You can see the beans up close, hear first crack and get a good feel for how the stages of the roast progress
- You can easily take samples during the roast (e.g. first crack + 30 secs, first crack + 1 min etc.)
- Cooling is built in!: you can cut the power to the heater and turn the blower fan up to rapidly cool the beans
Before I go any further there is a WARNING + DISCLAIMER:
This post is here for inspiration and ideas, but you are solely responsible for your own actions and safety. The project involves mains electricity and significant heating power so if you do try something like this please be really really careful. Spend time understanding the significant fire and lethal shock risks. Think about what might go wrong and if you are unsure about how to do something safely, stop. Don’t work on your roaster while it is plugged in and never leave it unattended while powered on
Also if you’re going to roast coffee (even with a retail home roaster) with all the chaff and heat that’s involved, you’re going to want these items:
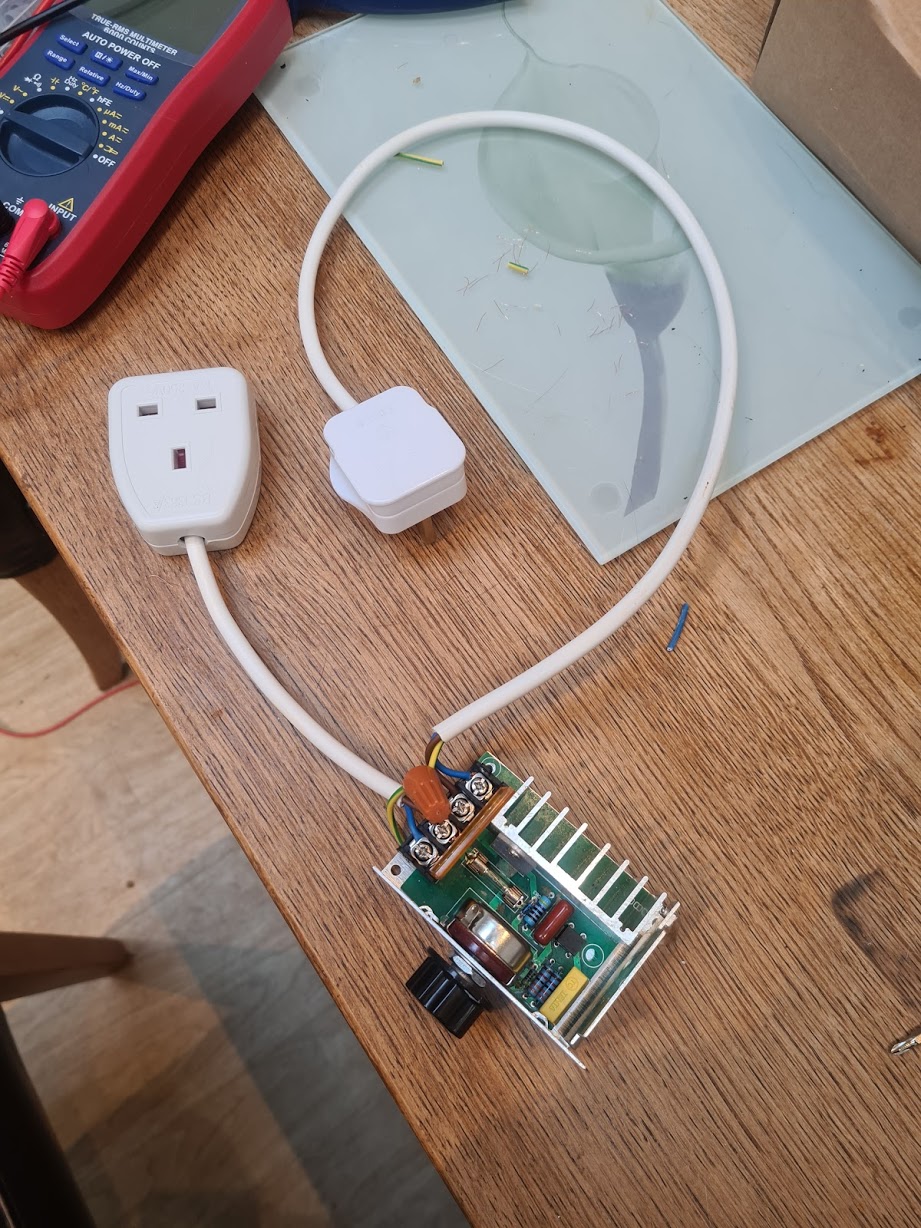
- RCD safety cutoff. E.g. like this power adaptor (some protection against fatal electric shock)
- Multimeter to check earthing
- If you’re roasting indoors: Fire extinguisher for electrical fires (powder type)
These are important general use items that you want in your home, I haven’t included them in the costs.
Now with that said, here are the parts I bought for the roaster:
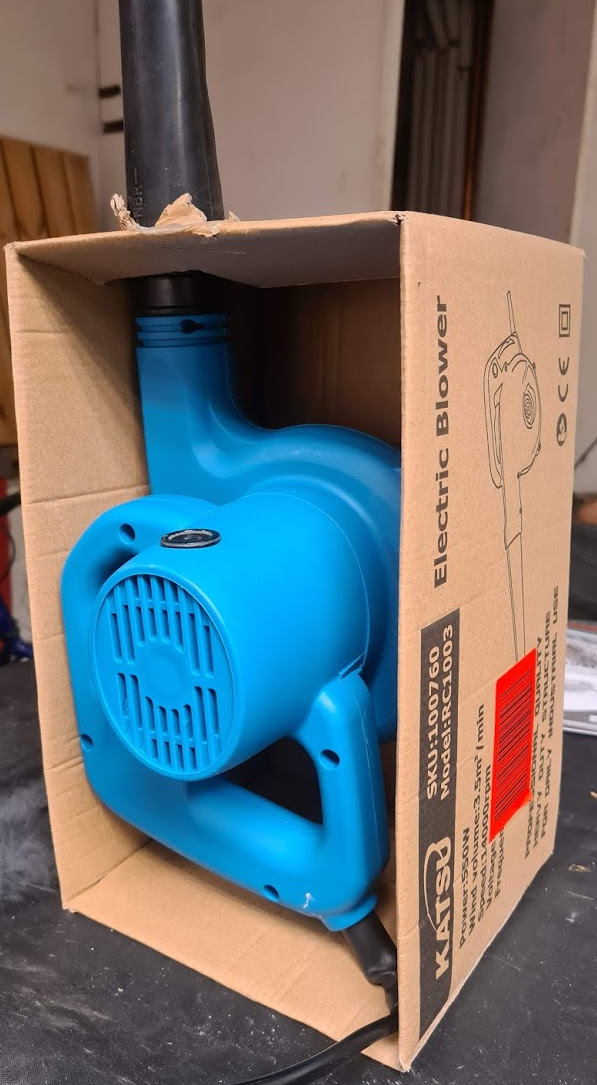
component price (uk) from 2kw heat gun with variable adjust dial 23.99 e.g. amazon 500w dust blower with variable dial 22.99 e.g. amazon N.B. It is very important that both units have a variable adjuster for precision, and not just a switch for low and high. Also it’s worth getting the highest power heatgun you can as I found this is the main limiting factor for the batch size you can roast. (If you do accidently buy a heatgun with a switch you can still use it, but you’ll need to add a variable AC dimmer yourself. e.g. I’ve previously used something like this).
Also I used:
- 3 tin cans
- Some wire mesh (e.g. cut out from a kitchen mesh strainer, or a sheet from a hardware store)
- 2 cardboard boxes (one of which the blower came in)
- Aluminium tape (heat tolerant to something high like 250c)


There were 3 main steps to build the prototype:
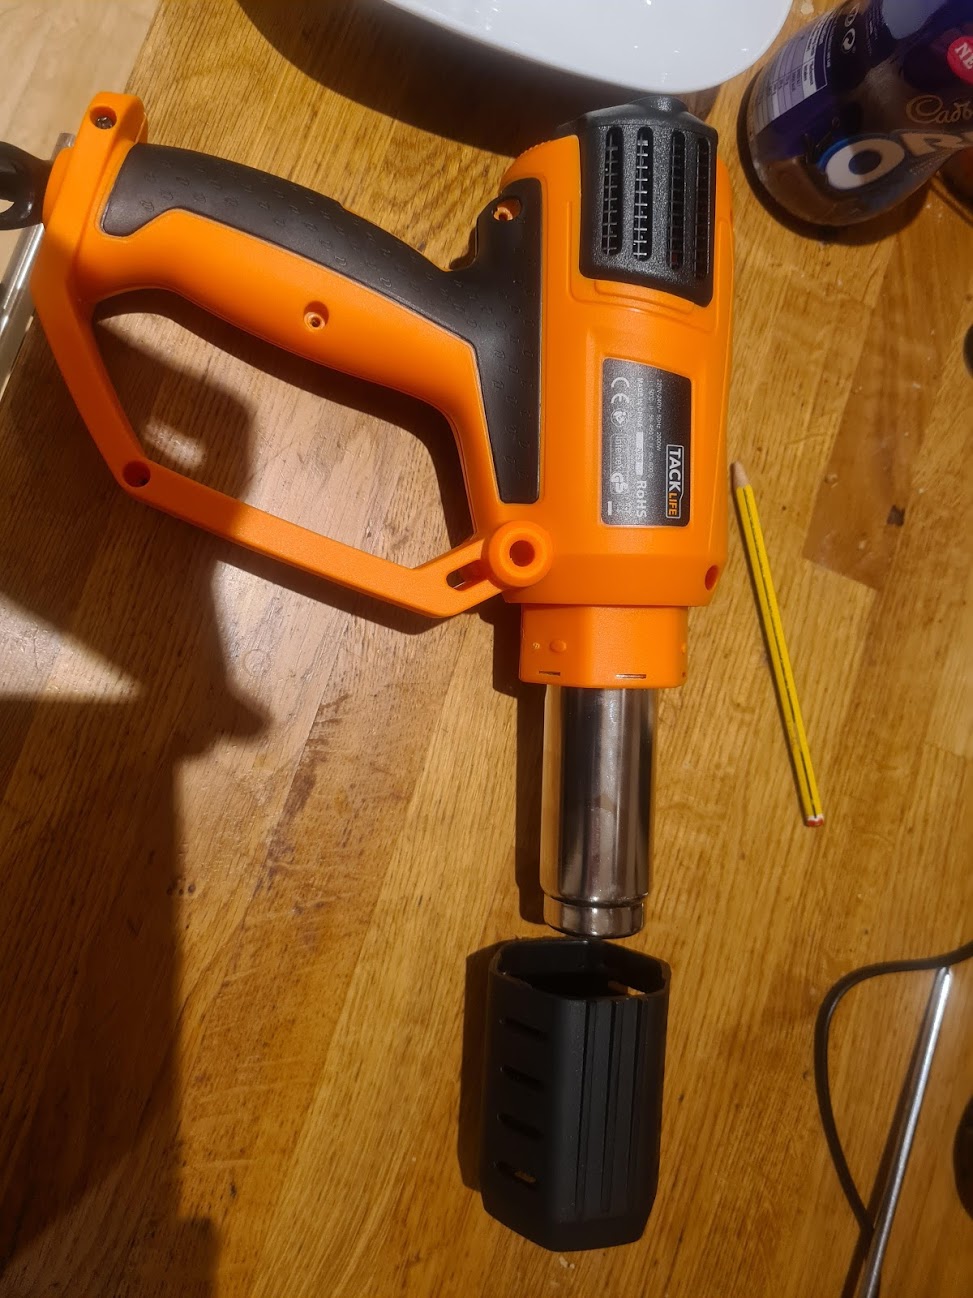
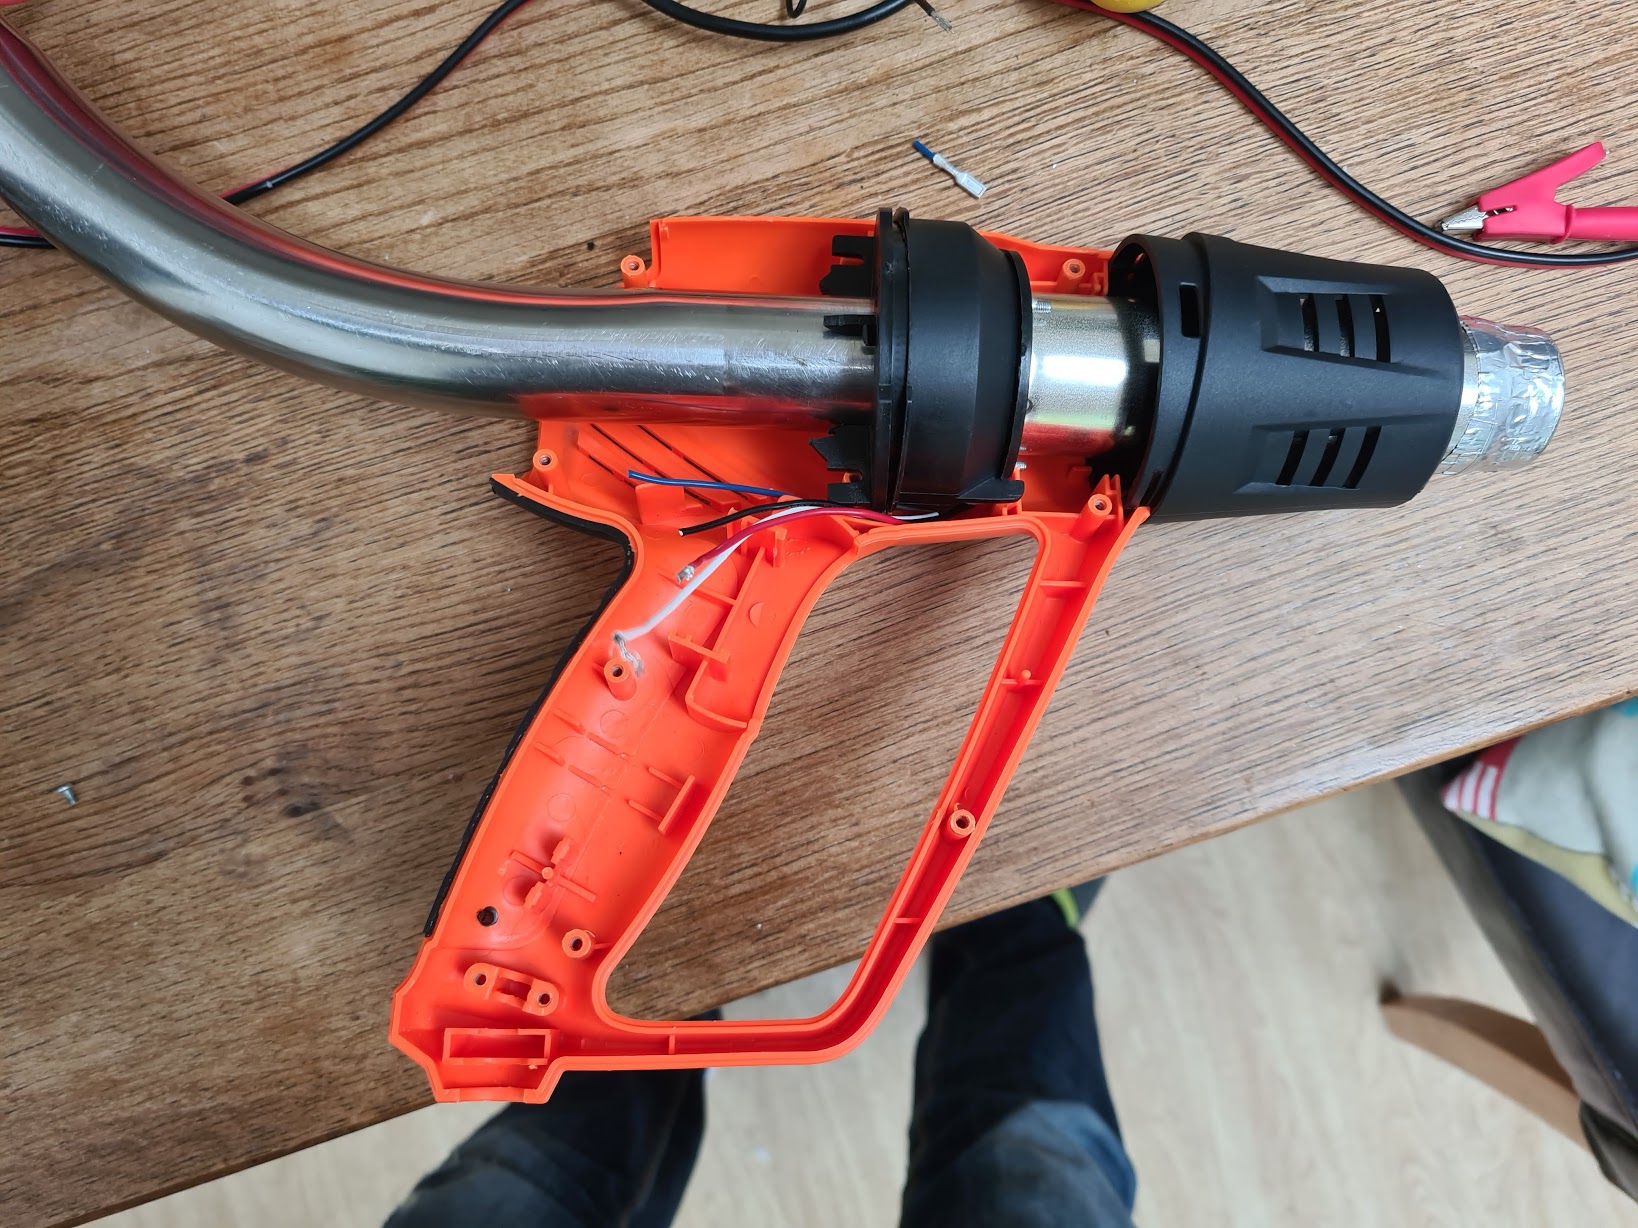
1: Remove the underpowered blower motor from the heatgun
A heatgun already has an internal blower motor, but it is too underpowered to loft green coffee beans. After testing the heatgun to make sure it worked, I set about removing the underpowered motor to leave a hole in the back so that the more powerful dust blower nozzle could be poked into it. Luckily a 500w dust blower is so powerful that it doesn’t need a tight fit at all to loft coffee beans, so just loosely pushing it in is enough. Here’s some pictures of the process:
Heatgun with the front sleve and some of the screws removed:
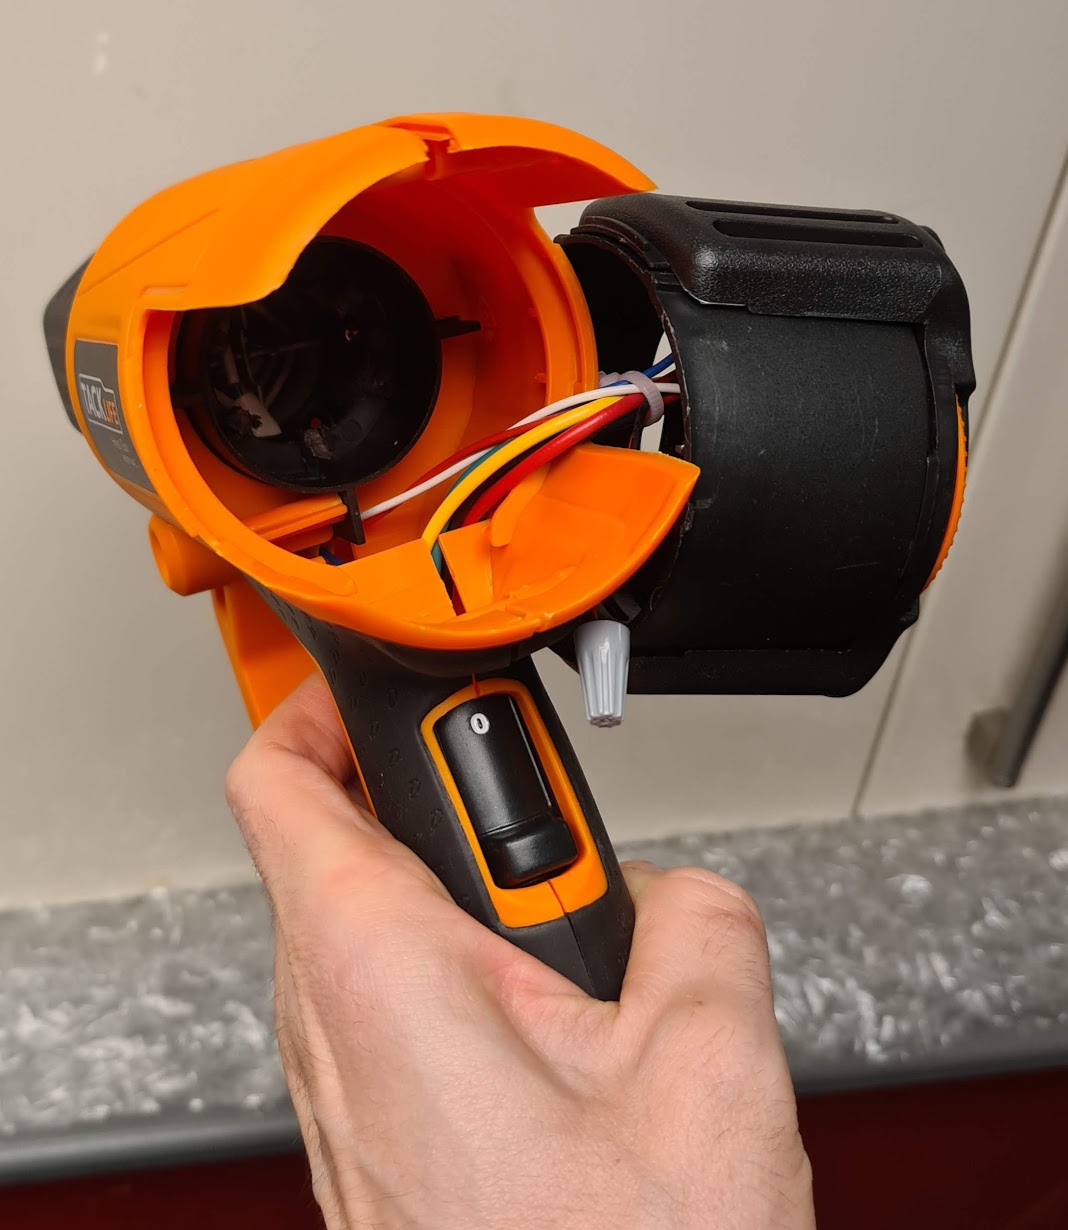
Here’s the heatgun all opened up. You can see the (underpowered) DC fan motor, the barrel (which contains the heating element) and the black plastic bit at the back which contains the circuit board with components to vary the AC power to the heating element and supply the motor with DC power:
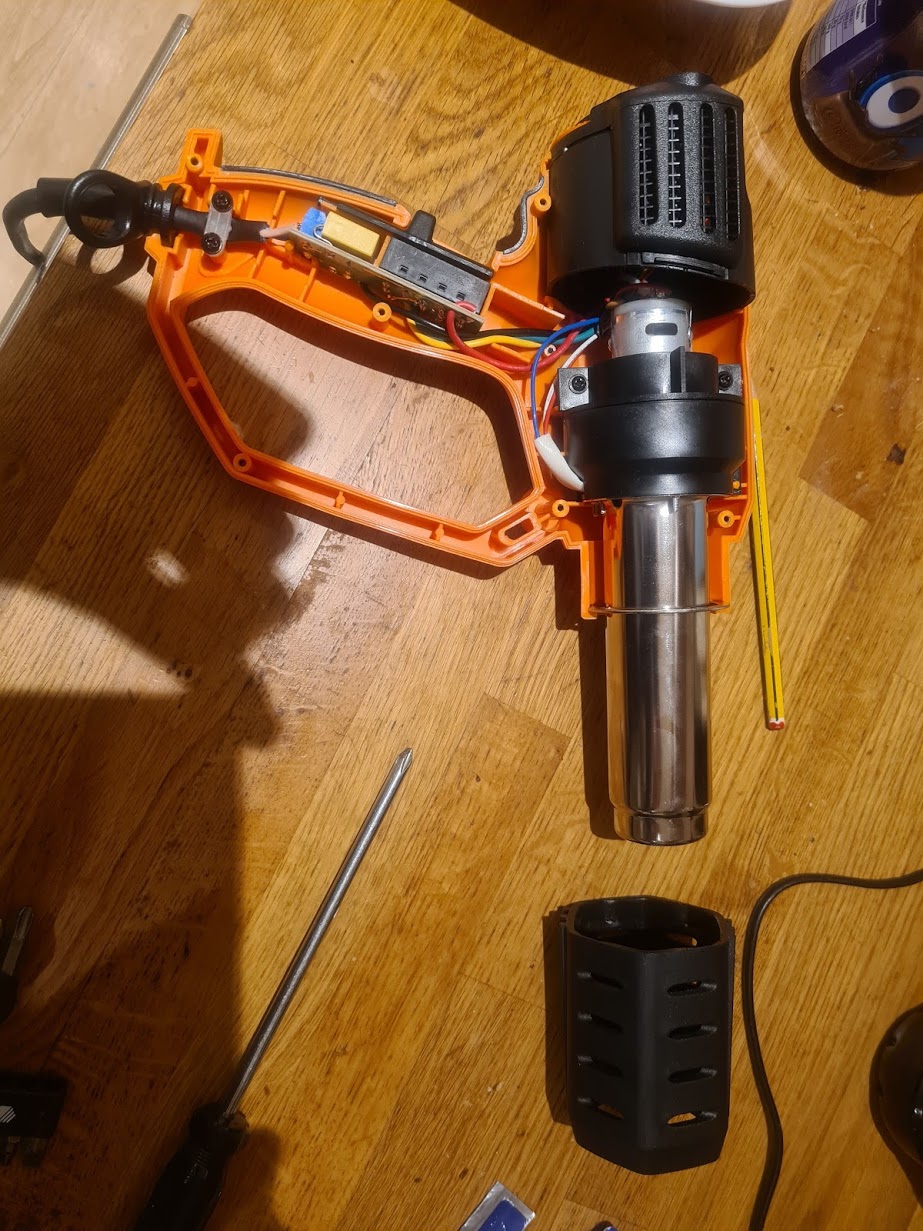
My heatgun had the temperature dial on the back of the unit, which seems quite common. It’s a bit of a pain because we need a hole in the back for the blower nozzle, but also need the dial accessible to vary the temperature while roasting. With the plastic housing off I was able to move the dial enclosure and the motor+fan out and round to the side, and then screw the gun housing back on to hold it in place:
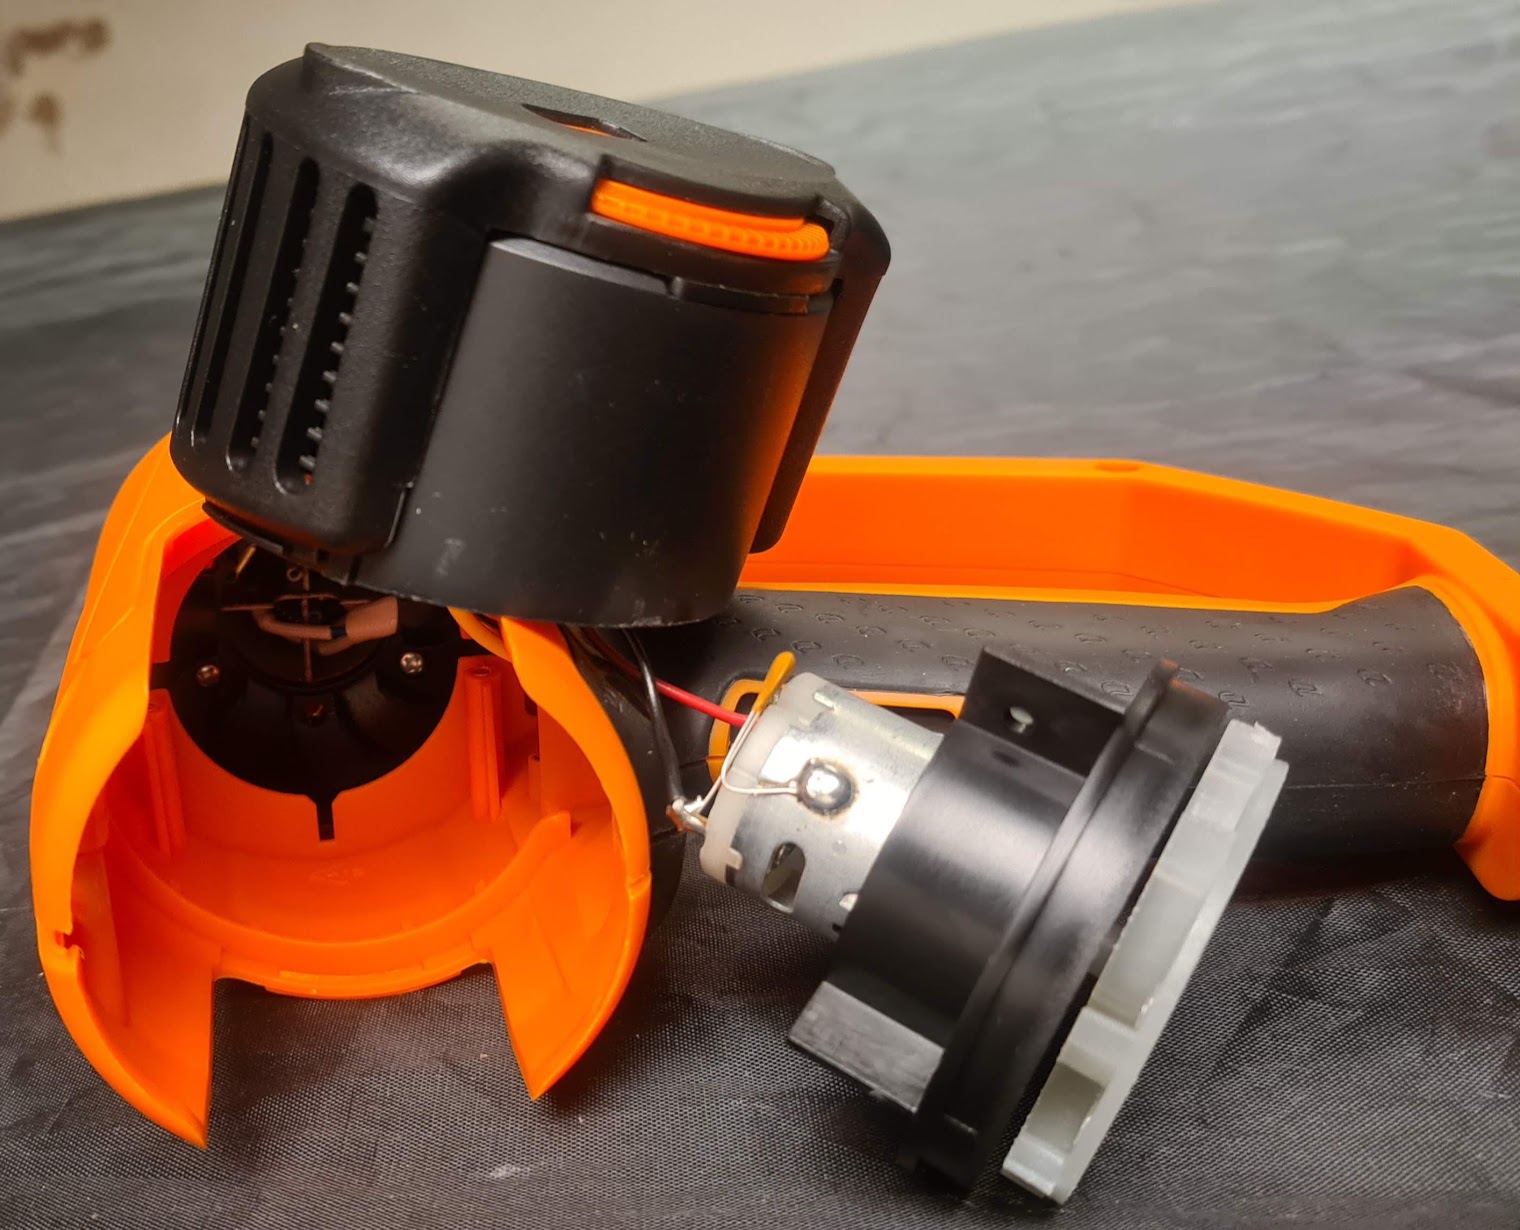
Here is the motor dangling off the side. I cut it off at the black and red wires and then connected them together with a screw terminal (next 2 pics). The wires need to be connected for the circuit to be complete otherwise the heatgun won’t work at all:

(Instead of a screw terminal I could have twisted the wires together and taped them with electrical insulation tape)
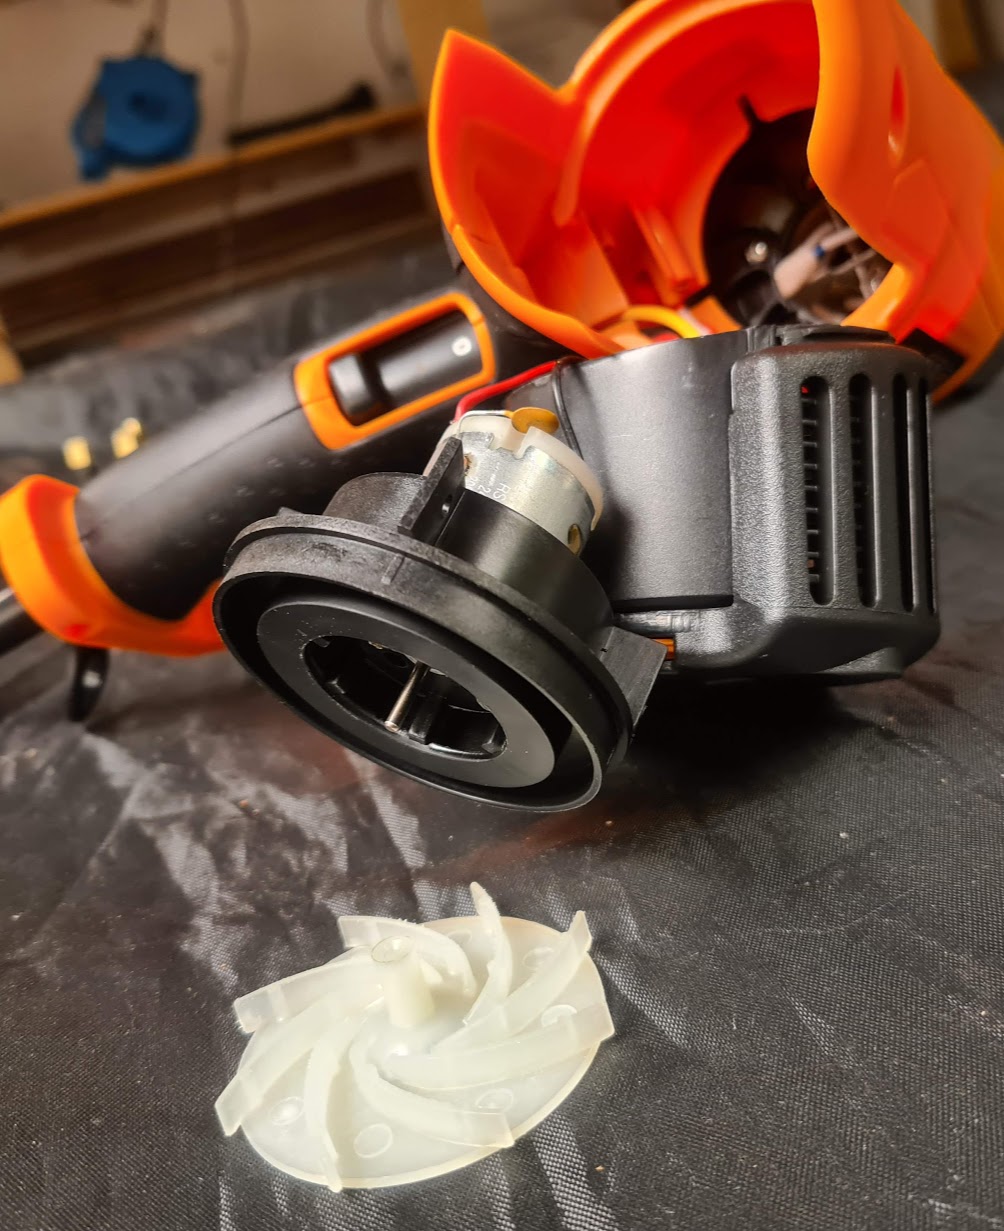
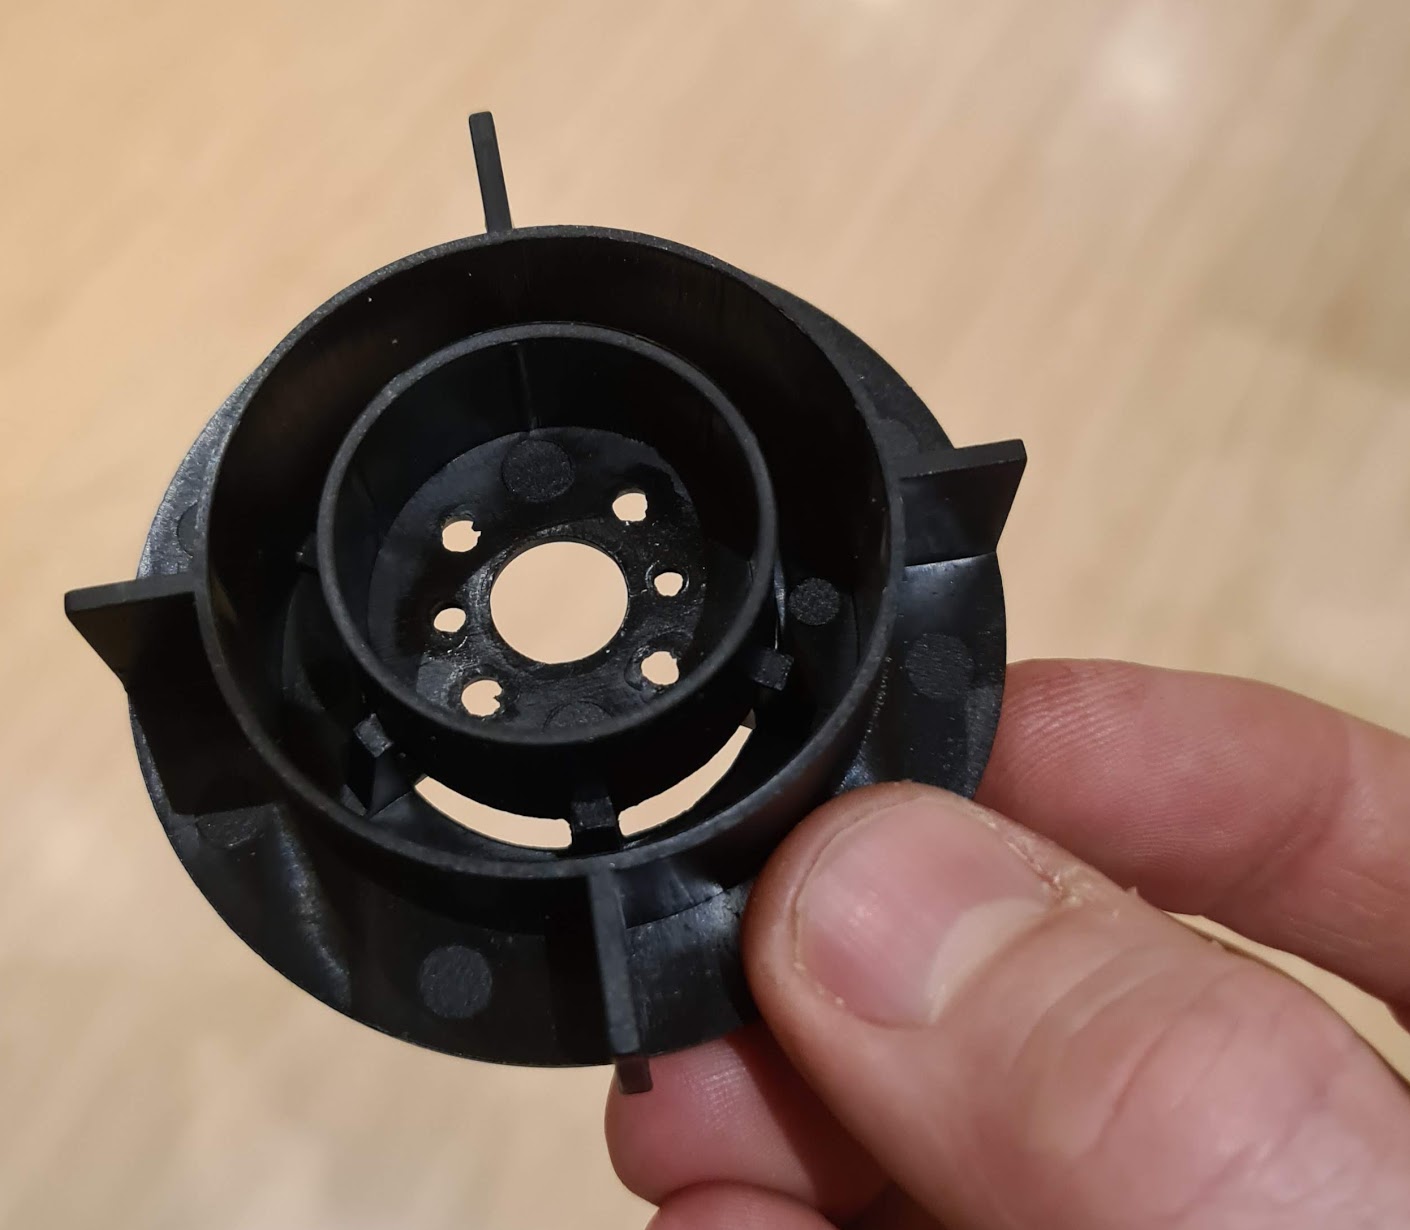
The hole in the back of the heatgun:
Below is the piece of motor housing that held the motor on. It can be useful to have a tight fitting piece for use as a shim to help seat the blower nozzle and get a tighter fit. It wasn’t strictly necessary - just having the gun sat loosely on the powerful airstream is enough. However if the nozzle is tight fitting you can run the blower on a lower setting and use less electricity:
The final heatgun unit:
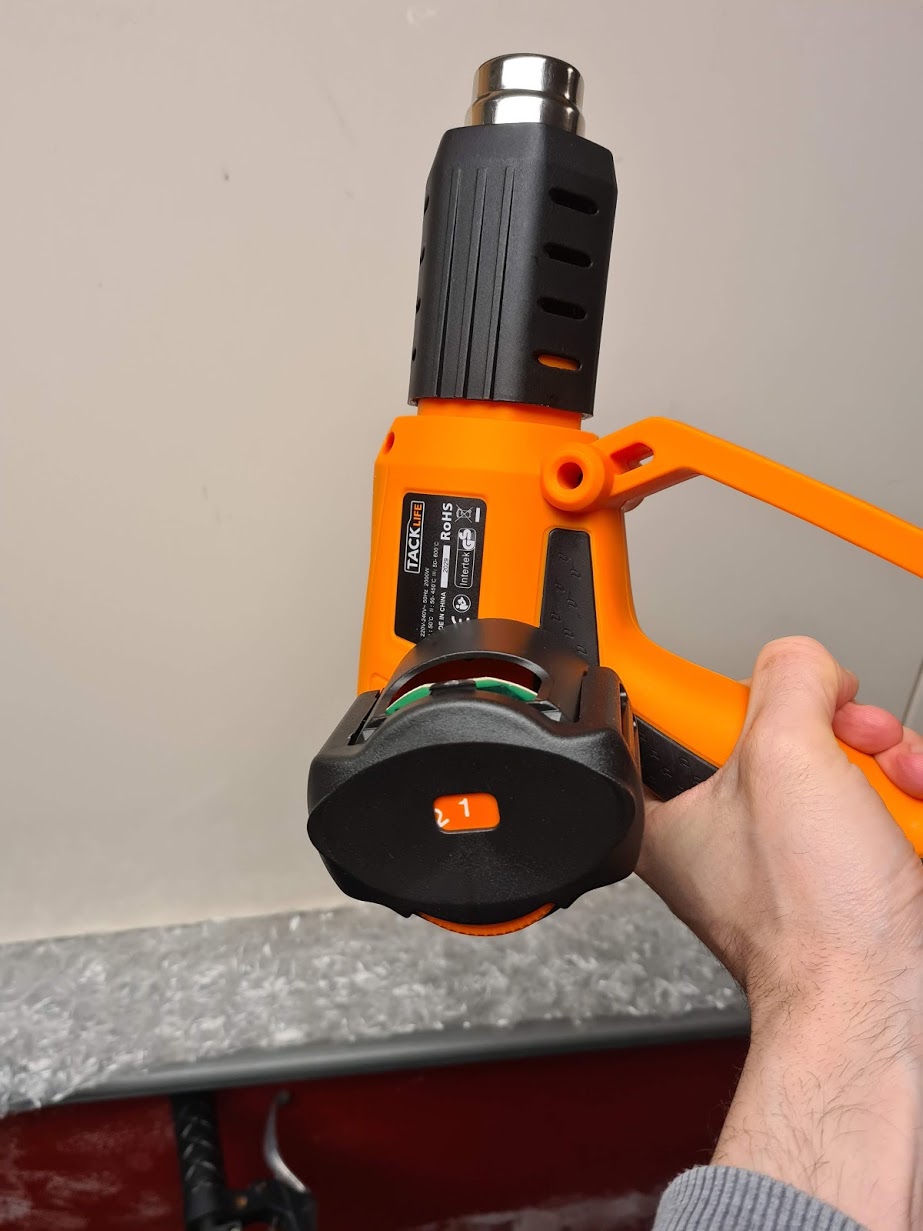
N.B. Don’t plug it in!!! Turning on the heatgun without air running through it will melt the heat element in seconds.
2: Build the roasting chamber
An air roasting chamber needs to (1) attach to the air stream nozzle and (2) hold the coffee beans and keep them circulating through the hot airflow.
The first stage involved putting a hole in the base of the tin can so that the heatgun nozzle could poke through. I drilled a hole in the base of the can and then used scissors to cut outwards. I cut some of the metal off and the remaining bits I bent over into the can using a screwdriver. Finally I forced the heatgun nozzle through to create a tightish fit:

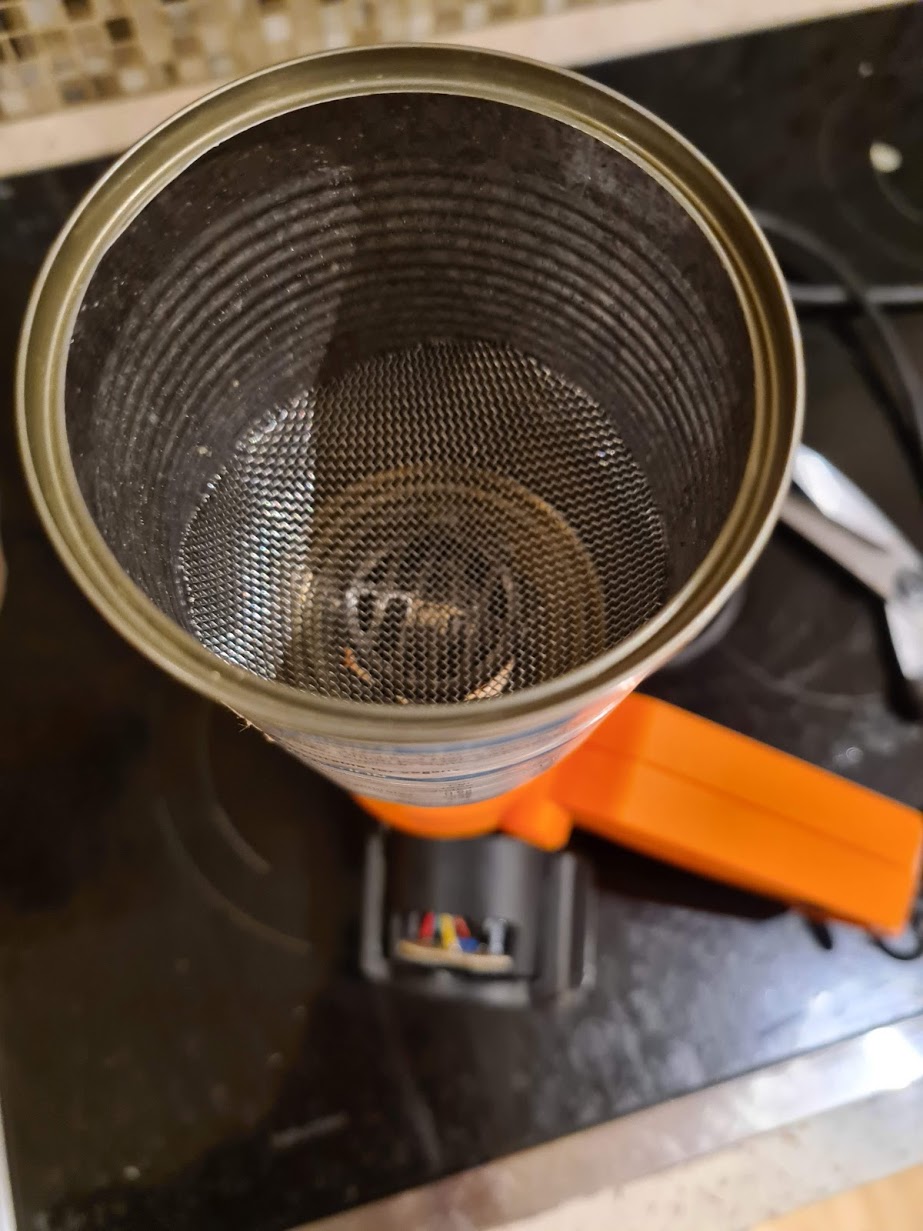
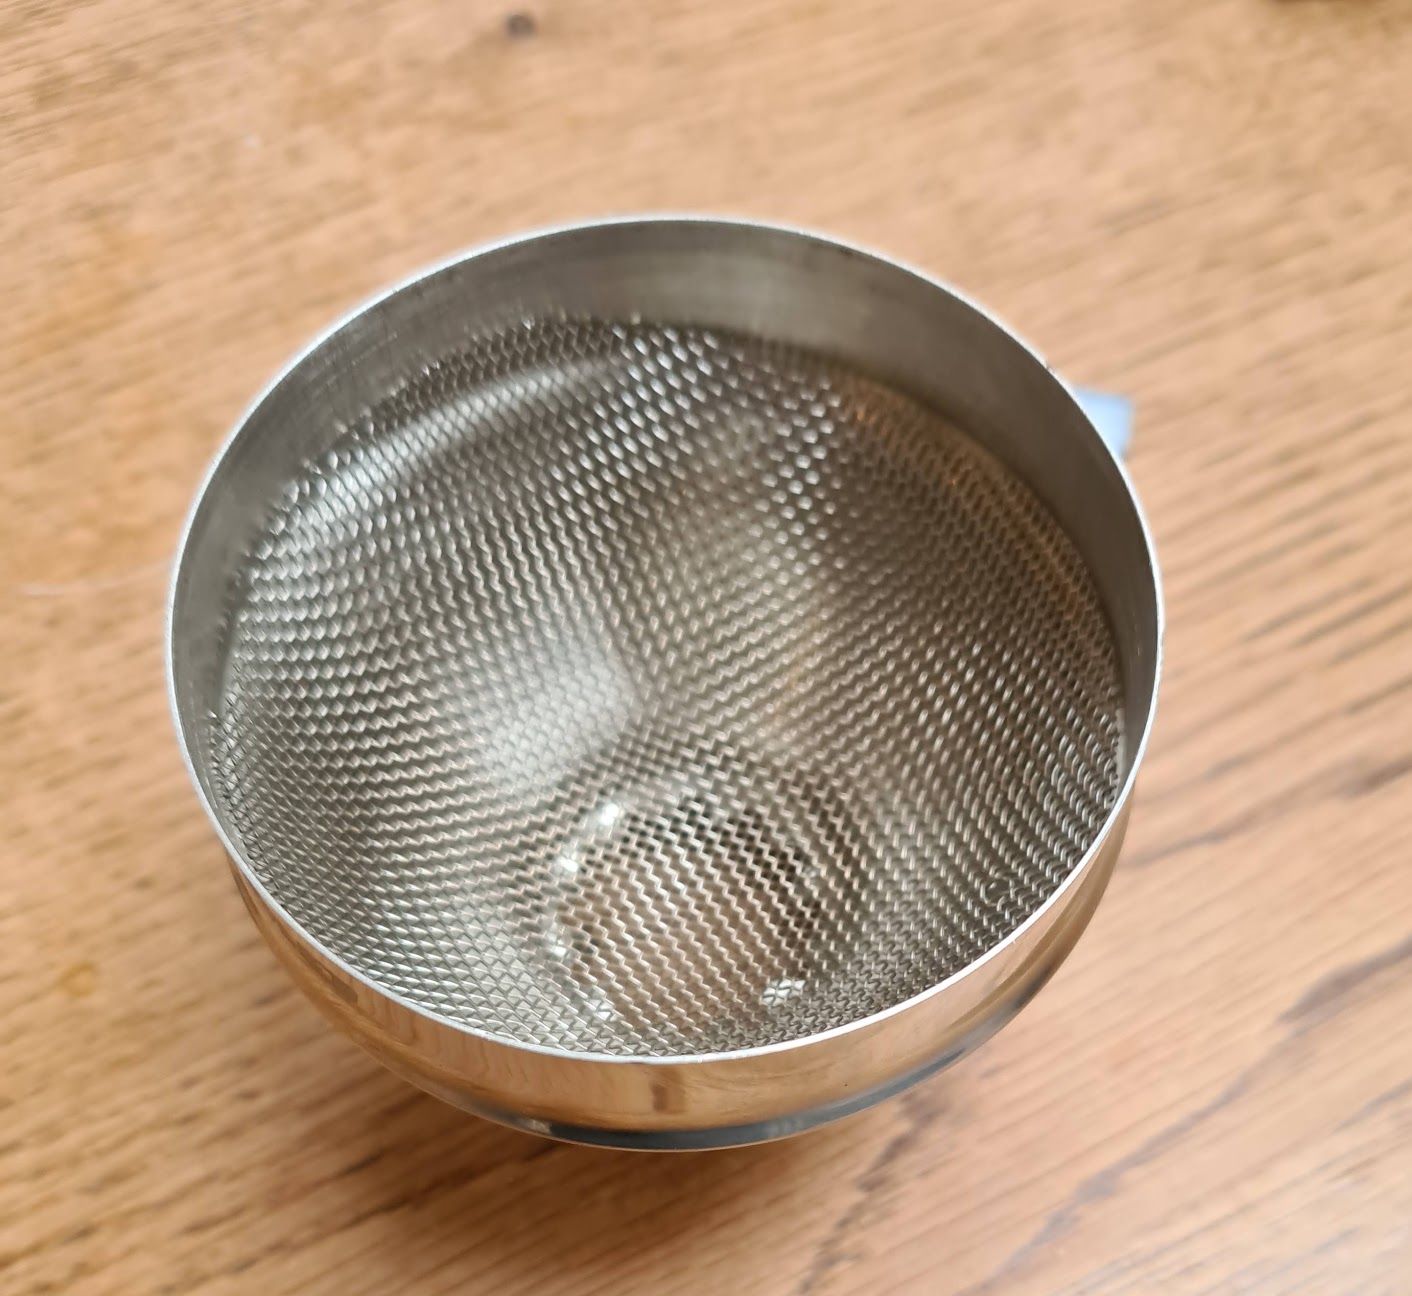
The cheapest, most straightforward way I could find to keep the beans circulating through the airflow was to create a sort of mesh bowl at the bottom of the can. I did this by roughly cutting a circle of mesh wider than the can, and pushing it in and down through the can to the bottom. Pressure holds it in a bowl shape, which is perfect for directing beans into the airflow:
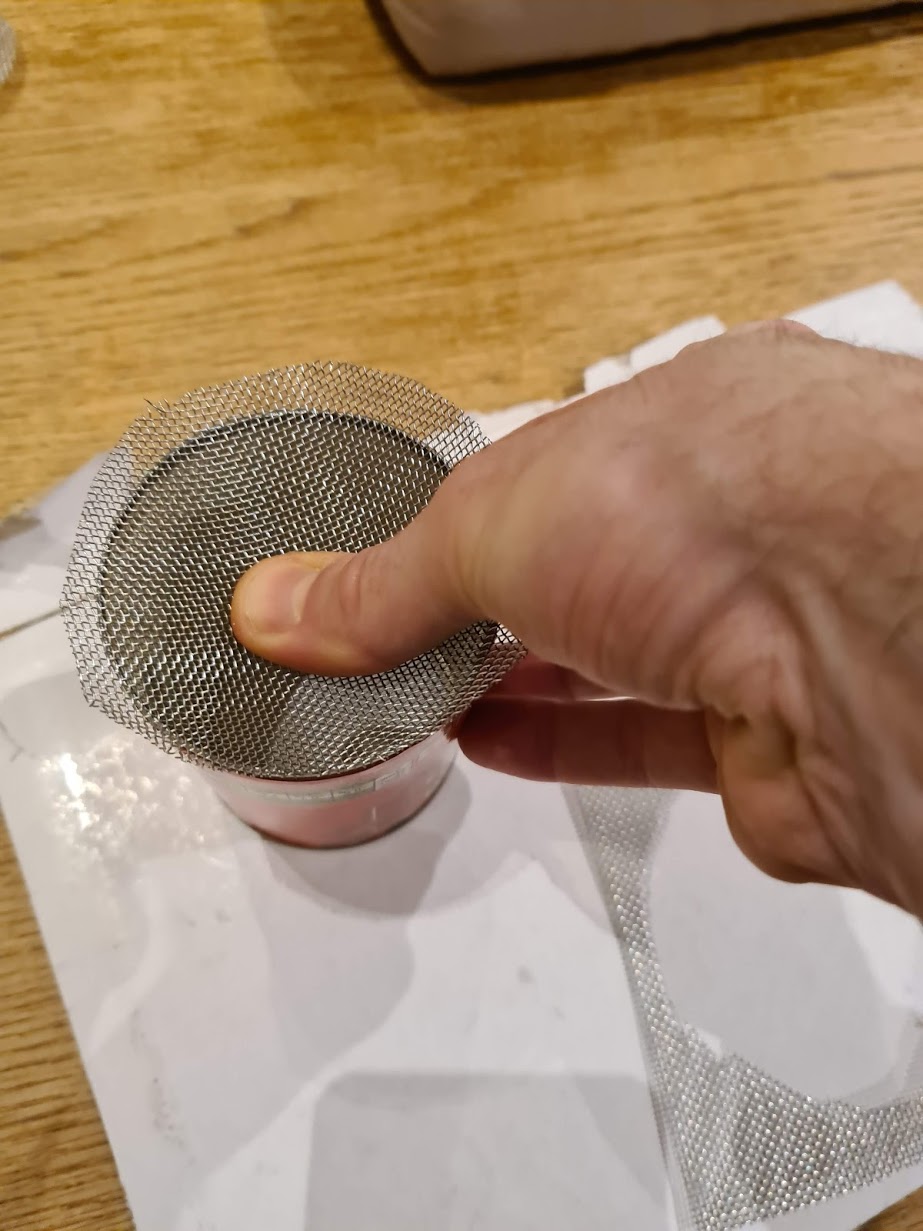
Here’s the roasting chamber attached to the nozzle:
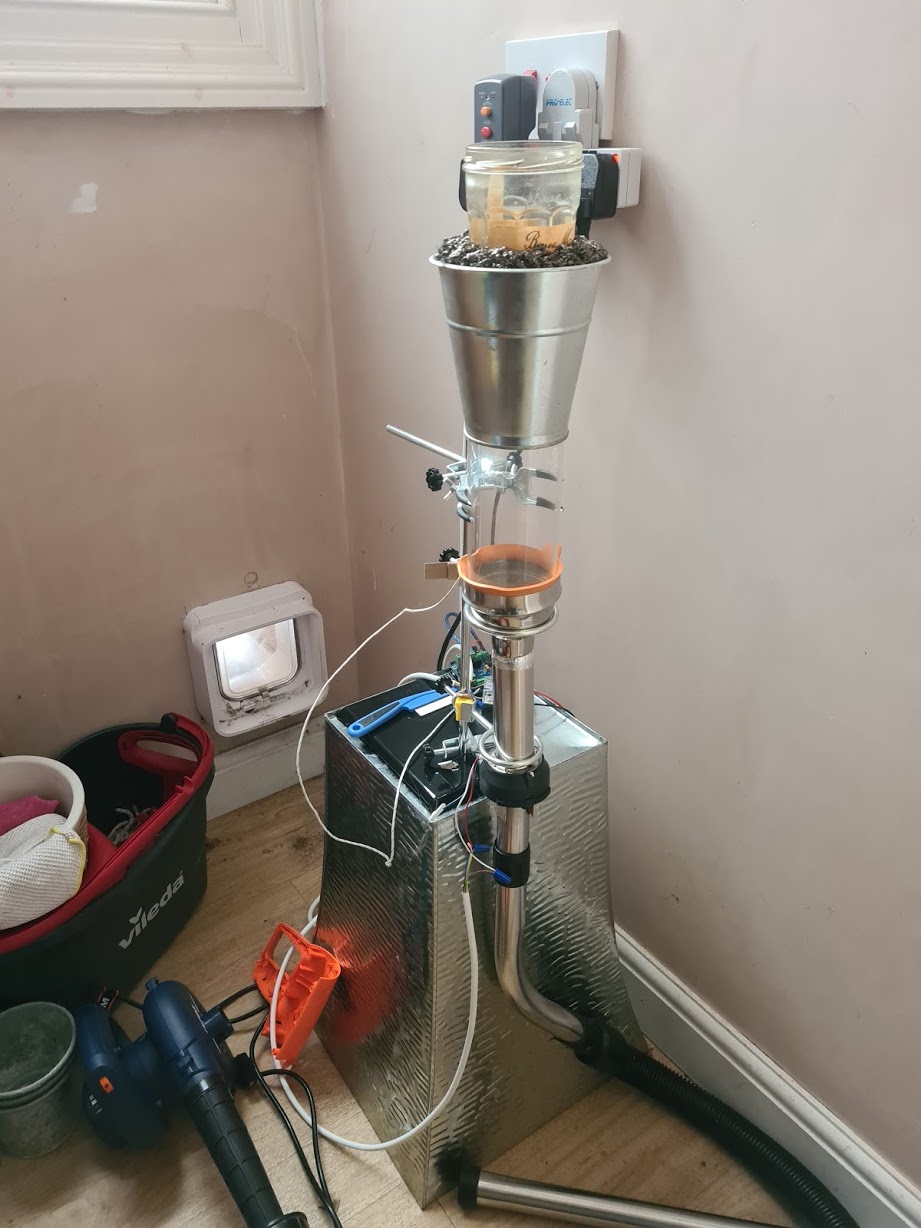
3: Stand it up and make it safe
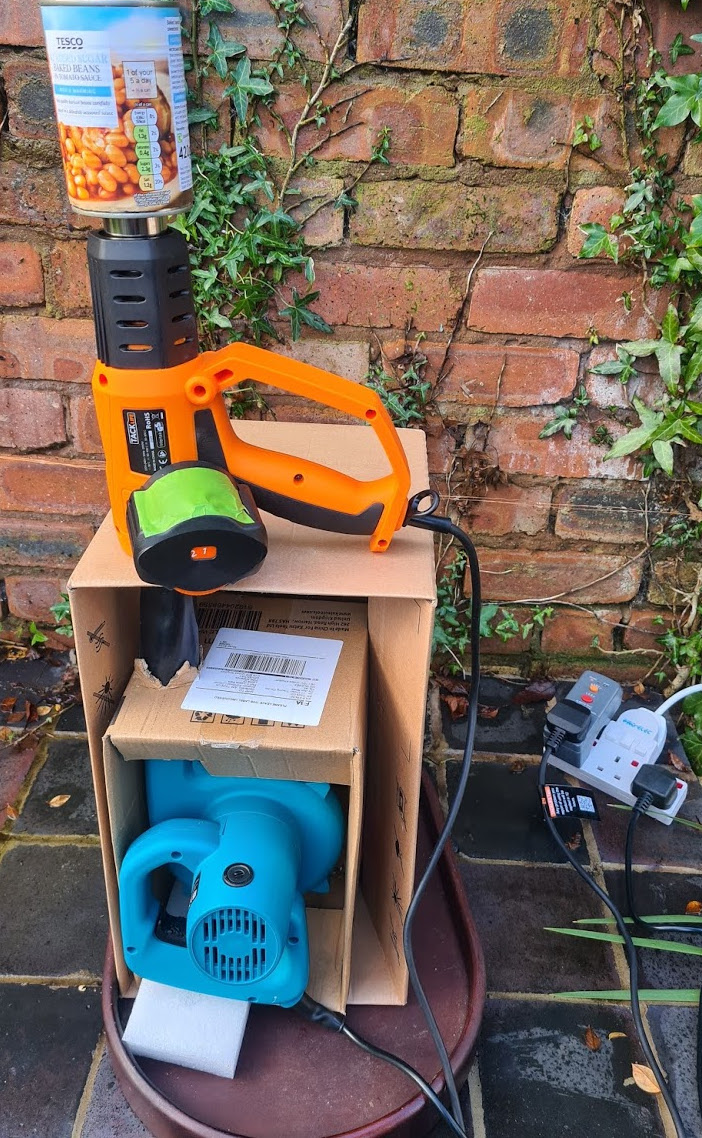
Unfortunately my blower wasn’t at all designed to be stood upwards so it required jamming really tightly into its cardboard box.
I ended up also packing it in a bit with a polystyrene block. I used two cardboard boxes in all with a hole poked in the top of each to get the whole thing stood up and stable.
I taped up any exposed holes in the heatgun from where I’d moved the dial with insulation tape. I then put the heatgun on the air blower nozzle.
N.B. you need to make sure the unit is very stable. It is worth having a trial run with beans but without turning the heater on just to check. Think about what you would do if the unit fell over. Mentally rehearse turning off the power to everything.
A note about power: You never want to run the heatgun without the air from the blower going through it because the element will melt very quickly. I tried to arrange things so that it is not easy to accidently turn off the fan while the heatgun is going. I locked the fan trigger switch in the on position and then used a 2-way power adaptor to turn both heater and fan on and off.
Roasting
I tend to put the beans in with the fan on low, and then turn it up until they circulate nicely:
Once they’re moving well I turn on the heater and slowly turn up the temperature.
It is not strictly necessary, but a stopwatch and some sort of temperature probe that goes above 220c is nice if you have them. If you don’t that’s also fine, plenty of entry-level fluid bed roasters come without temperature sensors.
Note that a temperature probe doesn’t need to be buried in the bean mass to track the roast - just measuring the exhaust temperature is good enough to track the roast repeatably. (IIRC the Ikawa professional sample roaster uses exhaust heat to control the roast). For my fluid bed roasters I tend to aim for first crack somewhere between 6-8 minutes, which is usually around 200-210c. (Here’s the first crack video from before):
And here’s me switching off the heater at the end of the roast but leaving the fan to quickly cool the beans.
I tend to let them get down to around 40c and then tip them out into a tray
Here are the beans from the first roast:

Finally, some upgrades:
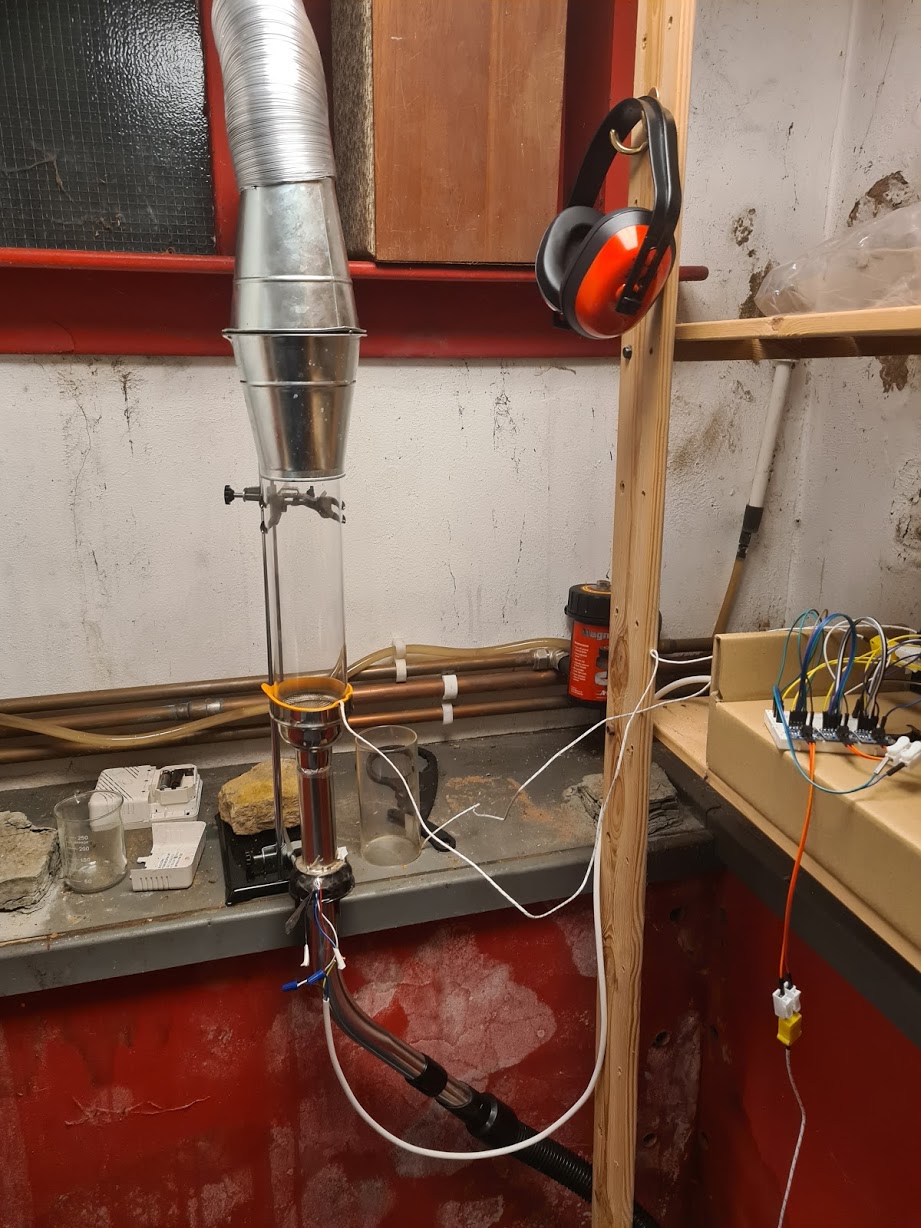
A glass roasting chamber
A glass roasting chamber is really nice for keeping an eye on the roast. Pyrex ‘bake-a-round’ tubes seem to be popular on the homeroaster forums, but I’ve never found a cheap one in the uk. Instead I found that ‘open ended candle holders’ are a good source of heat-proof borosilicate glass tubes, (sometimes called hurricane candle holders, I’m not sure why). For example here’s one on amazon currently for 17 quid.
I’ve previously bought 75mm diameter ones mainly because this is the same diameter as a tin-can so you can easily tape extra cans to the top for additional capacity. In my experience you mainly want to see what’s going on at the bottom of the chamber, so if you get a cheaper smallish one then it’s worth trying to put it at the base of the unit.
I found the sides to the glass tube were too slippy to do the ‘push in a mesh bowl’ trick. I’ve had some luck putting aluminium tape on the inside of the glass so the mesh bowl can grip: Here’s a video, with the blower comfortably lofting a 1/2 pound of green coffee beans:
Also note I tried making a base out of a jam jar lid. It turns out that the weight of the glass tube is enough that it can just sit on the jam jar lid when the blower is on and full of beans without any additional fixings (which was unexpected to me!). This would make it trivial to remove the chamber at the end of the roast to decant the beans.
I’m not sure how long the interior tape will hold up to frequent roasting though, I suspect it’ll get dusty with chaff. It might be better to use a half size tin-can for the base of the roast chamber with the mesh bowl in it, and then tape the glass tube to that so you can still peer in to see what’s going on at the base of the roast.
Ducting!
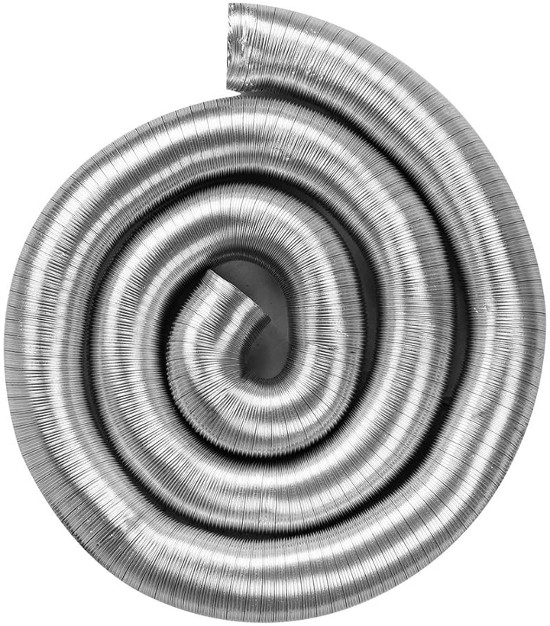
If you’re going to roast indoors then you’ll want a way to vent the smoke and chaff. I’ve been using this aluminum ducting hose which works really well.
I previously also made a chaff collector out of wire wool and tin cans, although these days I tend to just vent the chaff out of the window into the garden. If you don’t have that option, a chaff collector really cleans up the exhaust coming out the top of the unit
Arduino, Artisan, Automation!
My main roaster has an arduino with 3 probes and an SSR to control the heater. I use the excellent free opensource Artisan roast software to control the roast using its software PID. Describing how all this works is a bit involved and this post is already pretty long, so hopefully I’ll write about this in another post in the future.
-
Cheap DIY chaff collector
Somebody was interested in my chaff collector on reddit so that motivated me to put some pictures up. Here it is sat on my old popcorn popper based coffee roaster:
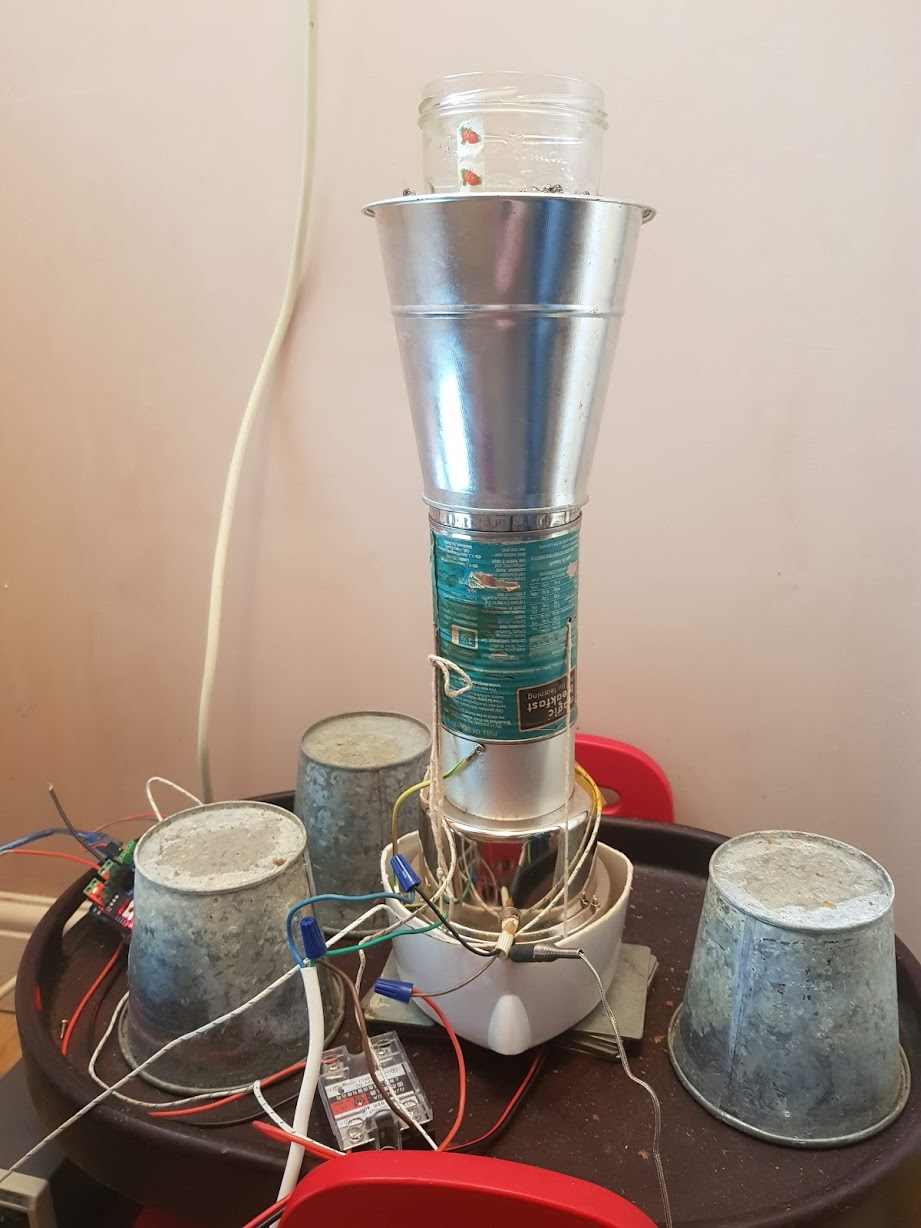
Basically it’s a baked-bean can with both ends taken off, with a jam jar jammed into the top end and vents cut in the side.
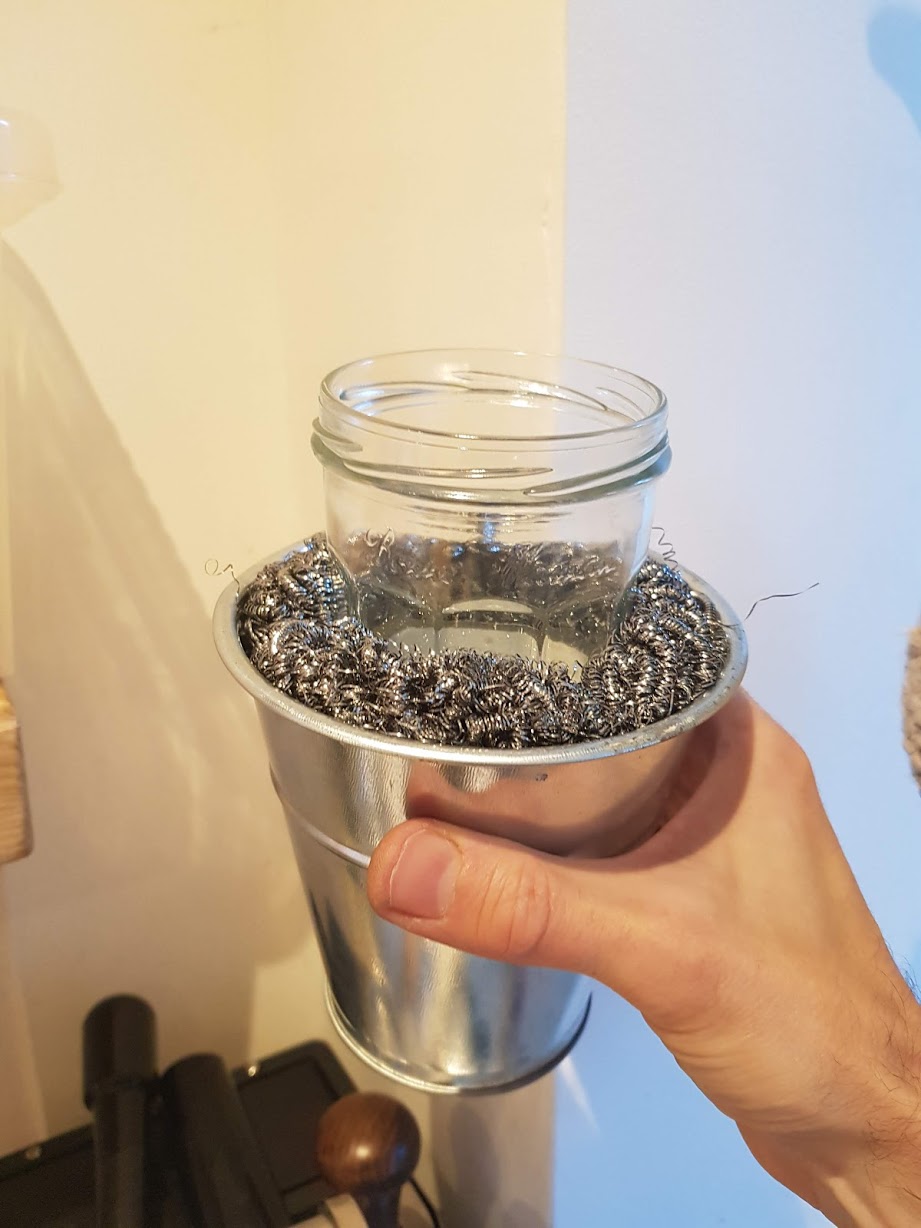
The can is then put inside a tin plant pot with a hole in the bottom and a couple of steel scourers are wedged around the jar to hold it in place and filter the exhaust.


The idea is that the chaff gets blown up through the bottom and out into the pot via the vents. The vents are cut and pried open so as to rotate the air in a sort of cyclone. The chaff then settles at the bottom of the collector in between the tin and the pot and the steel scourers stop any chaff escaping out the top. Every so often I empty the chaff out by lifting out one of the scourers:
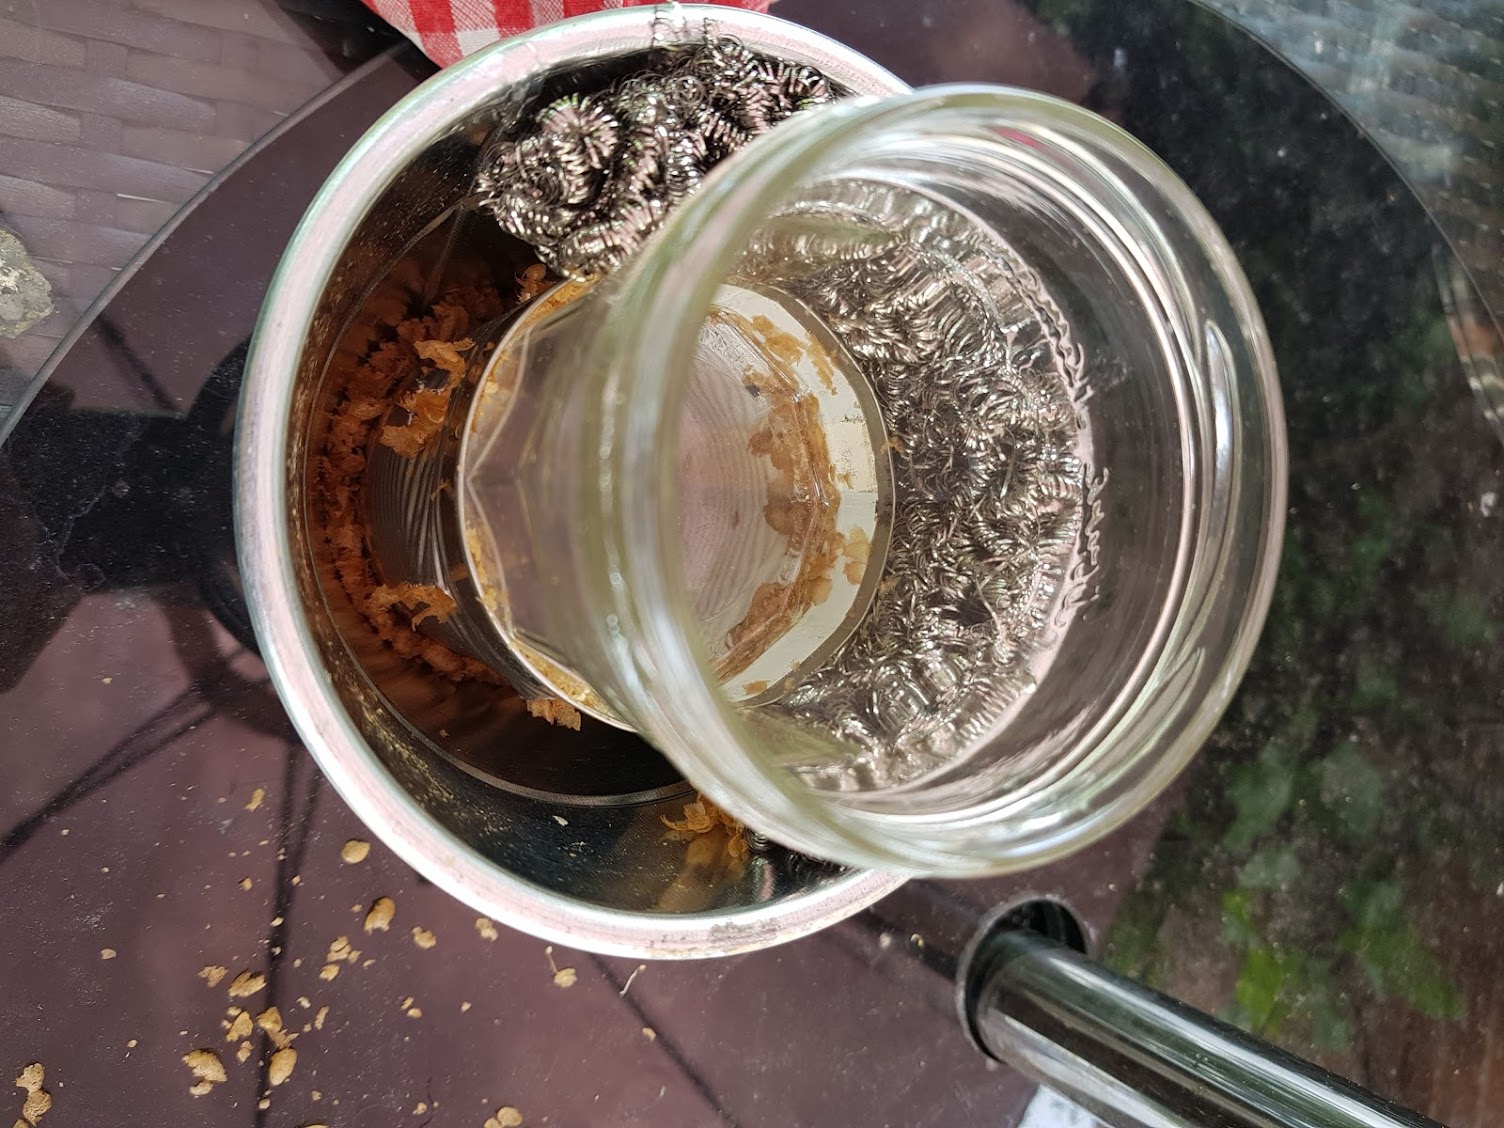
It works a lot better than I expected, removing all of the chaff and pretty much all of the smoke from the exhaust. It was instrumental in allowing me to move the roaster from outside to inside the house.
I guess the jam jar isn’t strictly necessary. I originally put it there to provide a way of looking into the roasting chamber on my old popcorn roaster, but it was never very effective for that purpose. The advantage it provides is actually the weight it adds to the collector.
Below is a picture of the base of the plant pot just prior to cutting. I cut between the small holes so there was a hole big enough to wedge the baked bean can through. If I was to do it again I’d make the hole smaller and just sit the can+jar in the pot.
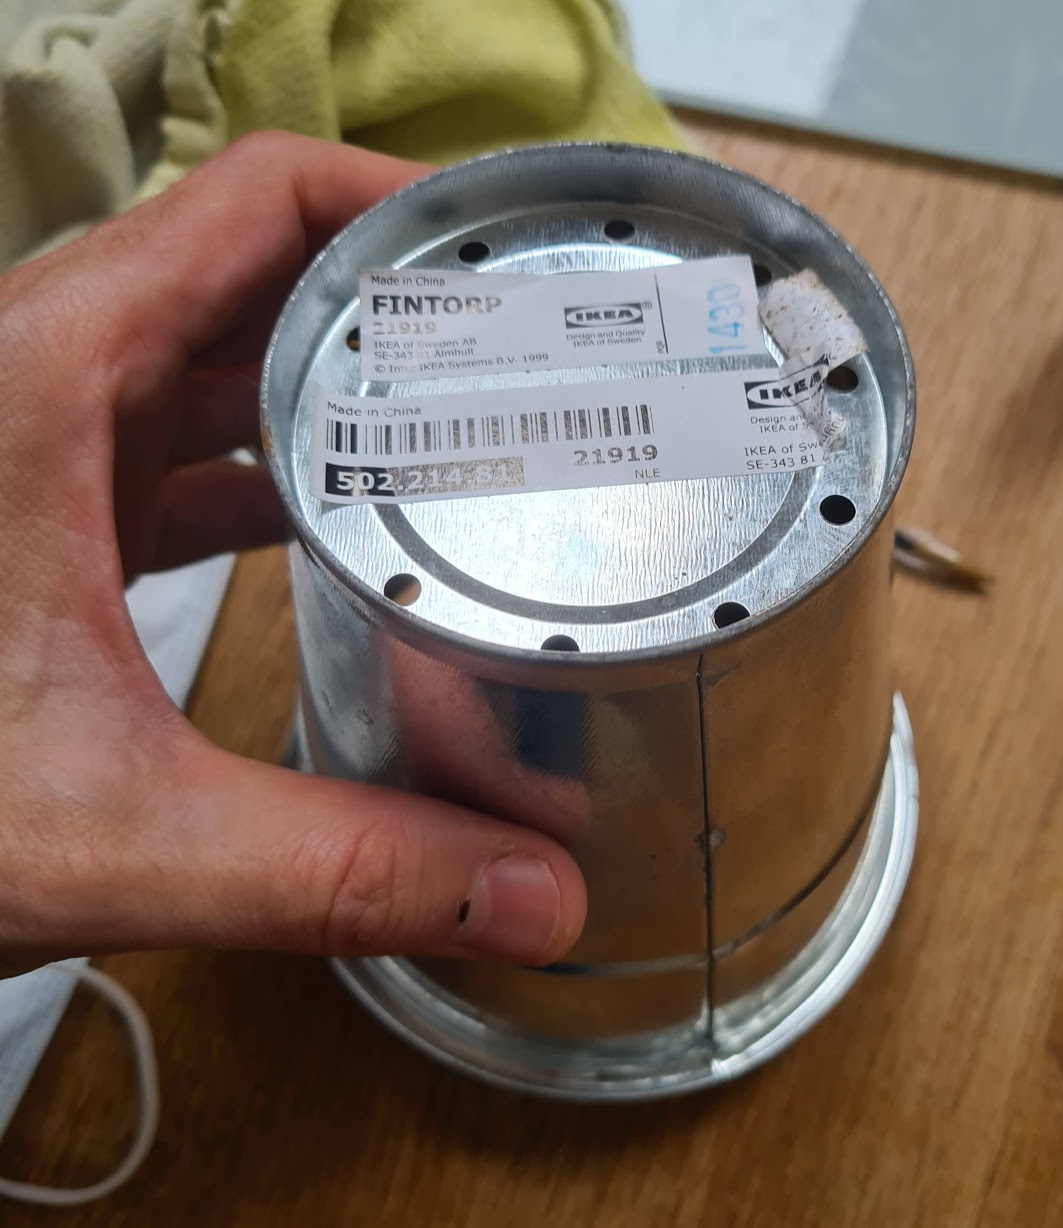
This particular tin plant pot has a nice lip at the bottom which makes it easy to sit on a circular roasting chamber. The weight of the jar is enough to stop the collector moving or blowing off because the scourers provide surprisingly little air resistance for the filtering they do, and they don’t seem to get bunged up with chaff. If the collector needed more weight I could put something in the jar to weigh it down, but this hasn’t been necessary even with my new 400w blower on full power.
I can’t really take credit for the design as I think I pinched it from a youtube video a while back. If I remember correctly there was a retired gentleman showing off his popcorn roaster and it included this design or something like it. I haven’t got the link now, please let me know if you see it and I’ll give him full credit.
Update! I think it was this video featuring somebody called ‘Chicago John’, although his collector is a bit more sophisticated than I remember! Thanks John!
Anyway, here’s a picture of my roaster in its latest incarnation: I now have the longer borosilicate roasting chamber I mentioned at the end of the previous post and I’ve also attached aluminium ducting to another tin pot so that it can sit on top of the chaff collector and vent the remaining fumes during first crack.
-
Fluid Bed Air Coffee Roaster
I reached some limitations with my severin popcorn based coffee roaster trying to roast bigger batches. I found that increasing the airflow was simple enough: prizing open the vents a little at the bottom of the chamber makes a big difference. Unfortunately increasing the heat was trickier: I put a metal bin over the top of he whole unit which caused the hot air to recirculate. After a bunch of successful roasts the fan gave out and melted.
I’ve built a new roaster based on various ideas stolen from forum.homeroasters.org and some youtube videos. The design is basically along the lines of this fluid bed roaster, but everything is push-fit rather than welded. (more like jammed-together-fit).
Basically it’s a vacuum blower jammed into the back of a heatgun element to generate hot air flow. The roasting chamber is a glass candle chimney tube pushed into a cocktail shaker lid. The chaff collector is made from a tin plant pot and a stainless steel washing up scourer.
I thought I’d post some pictures and details because I’ve enjoyed looking at (and copying) pictures of other people’s coffee roaster builds.
Component list
The main bits are:
component price (uk) from Borosilicate glass candle chimney 75mm x 152mm 16.00 amazon Von haus 2kw heat gun 22.99 amazon ferm 400w dust blower 29.99 amazon Metal mesh 9.99 (I overpaid!) amazon hose pipe from old henry vacuum maybe 10 quid to buy off ebay as spares (actually free because I had a knackered henry) Lid from a cocktail shaker 10? (actually free because I butchered one we already had) Aluminium tape (heat proof to 250c) 5.49 amazon Voltage dimmer 6.99 amazon –
(amazon links are just basic links, not affiliate. I don’t get any money from these)
Details
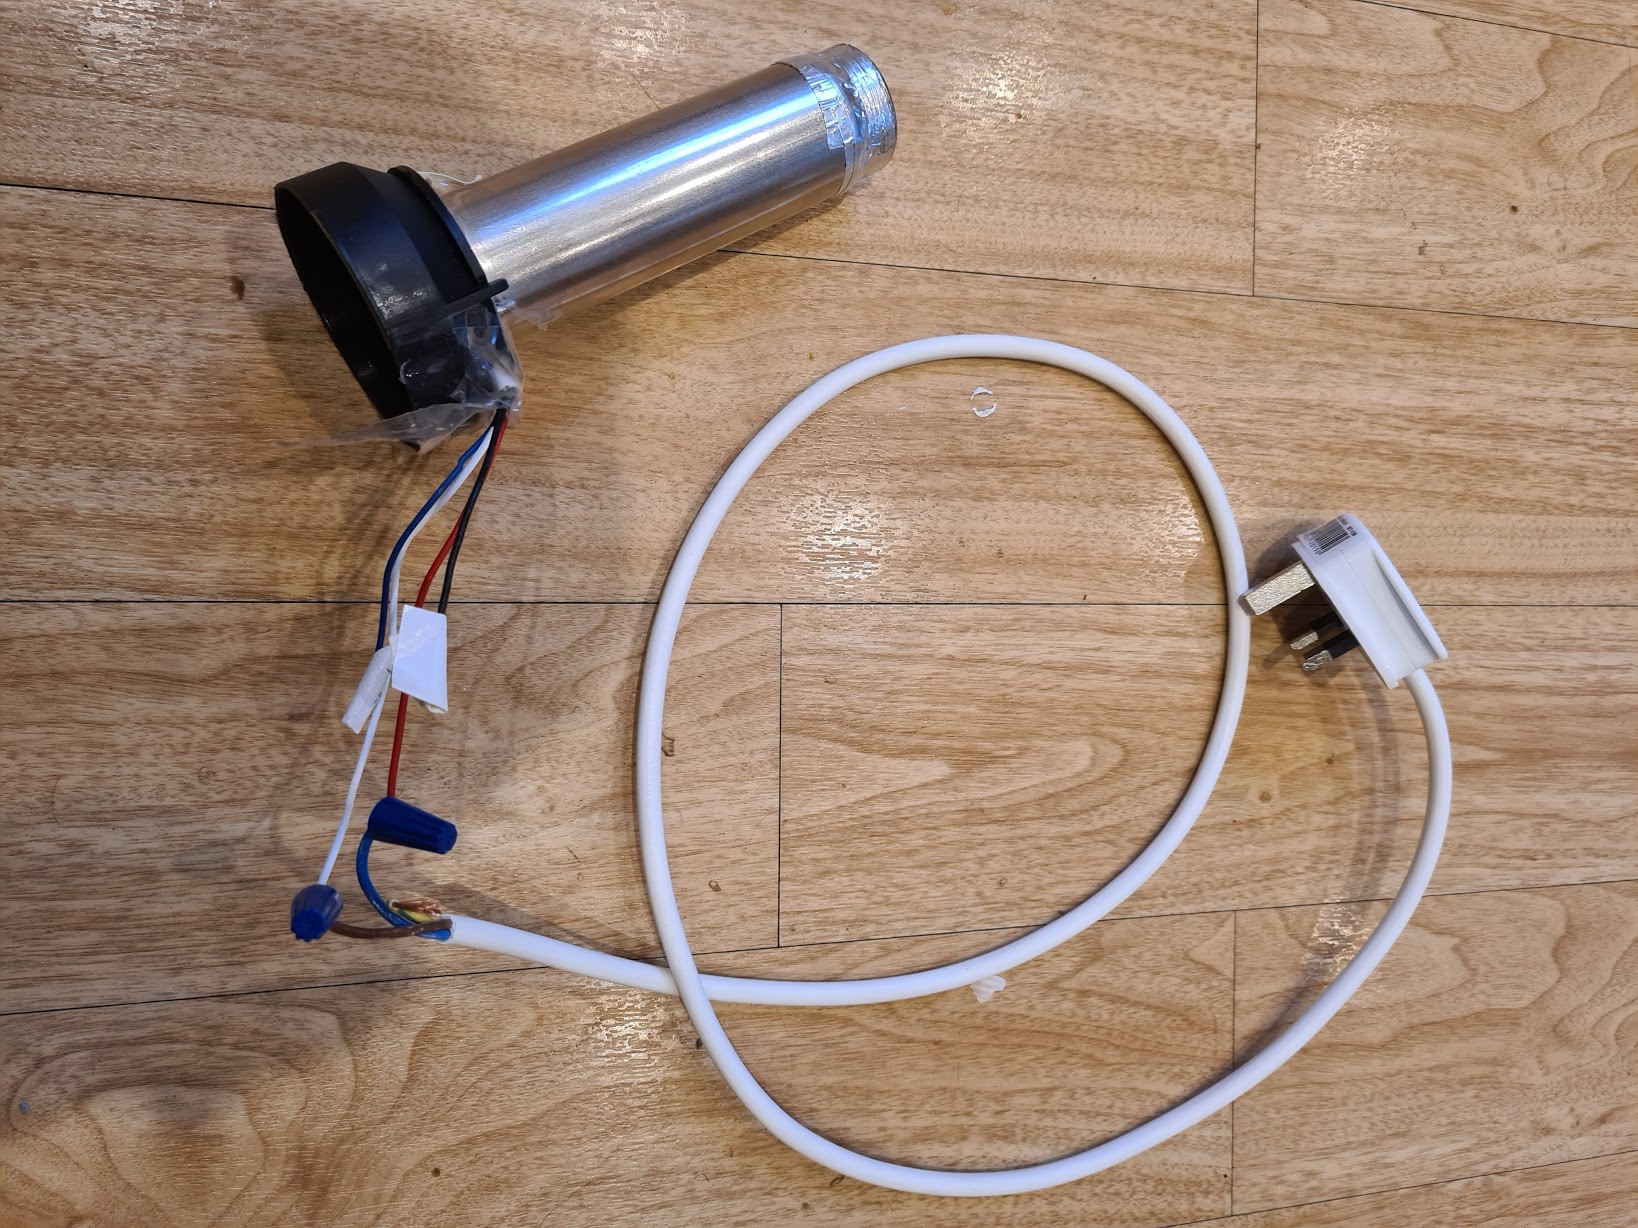
Vacuum blower + Heatgun
I bought the heatgun first and then put everything else together around that. Unfortunately the fan in the heatgun isn’t powerful enough to loft beans on its own so I got the vacuum blower.
(I got that specific blower model because I read that somebody in the homeroasters forum had already tried it and said it was plenty powerful. A cheaper model might be just as good)
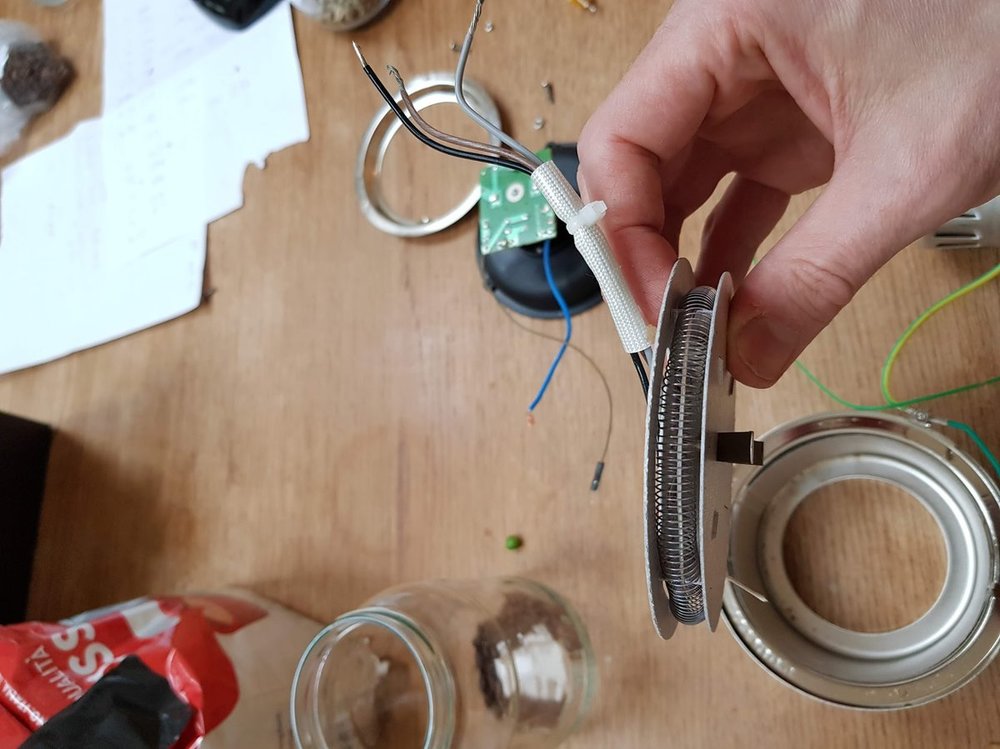
I unscrewed the heatgun and cut the fan out. I found that the hole left in the bottom was a perfect fit for a henry vacuum hose.

Although the pictures at the top of the post show a clamp stand being used to hold the thing together, the heatgun housing will actually stand up by itself. For a short while I was roasting using that with the roasting chamber balanced on top.
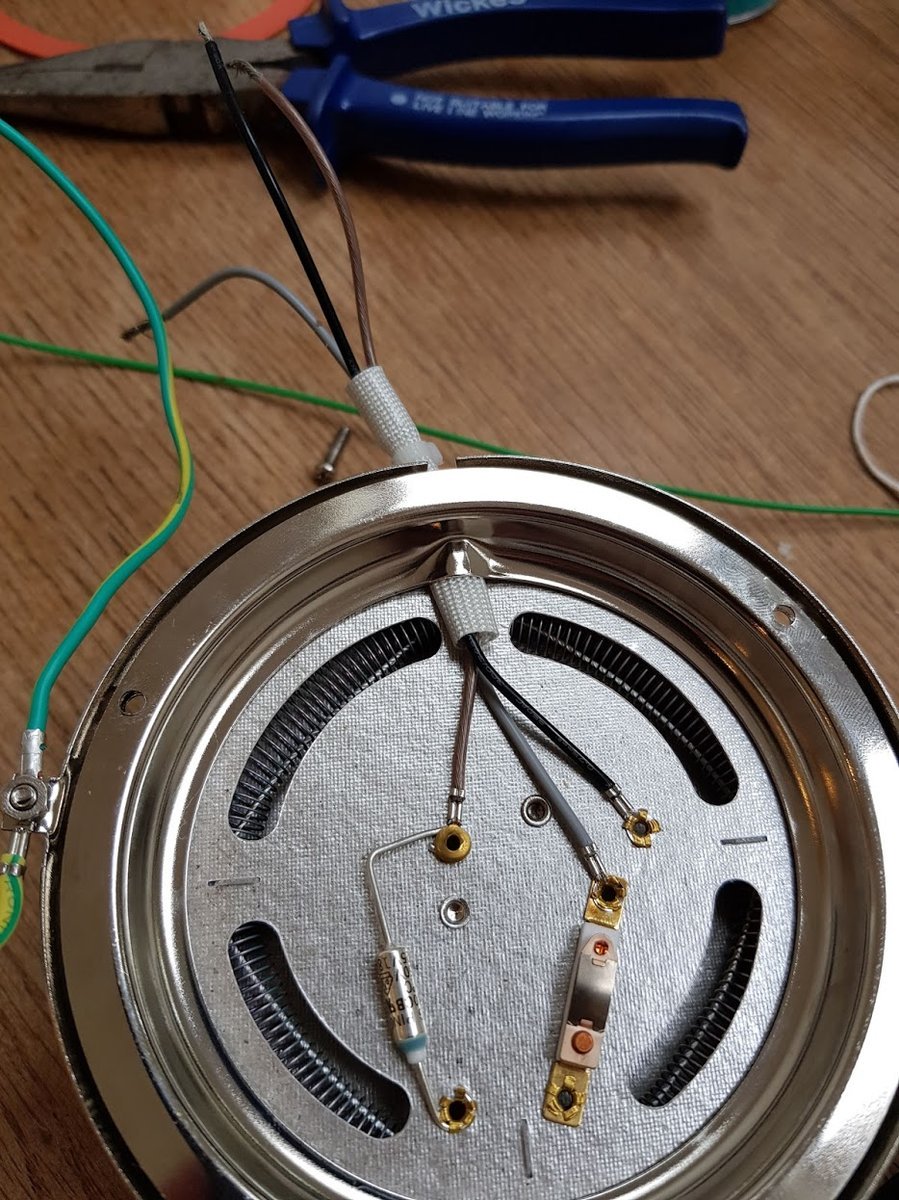
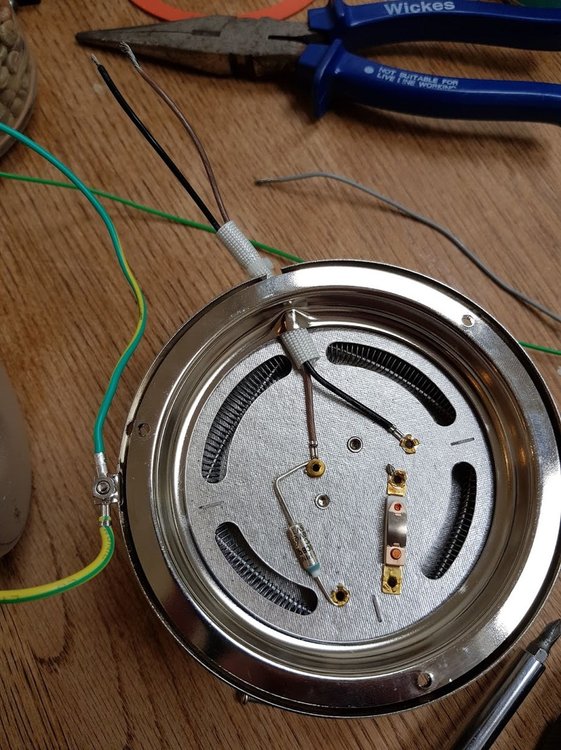
Heating element
I used a multimeter and the voltage controller to figure out which heater wires to plug the power into. (It’s the red and white wire!)
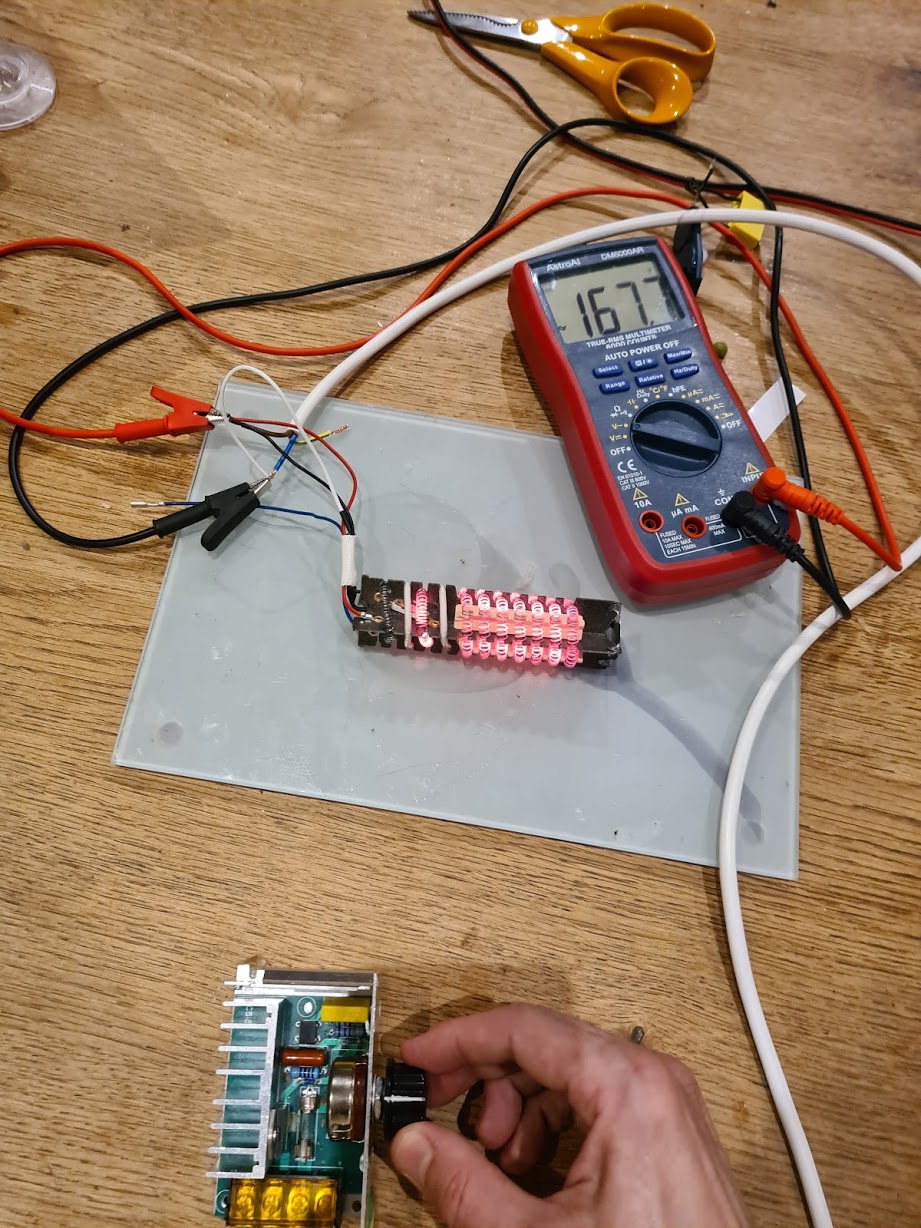
Heatgun barrel back together again:
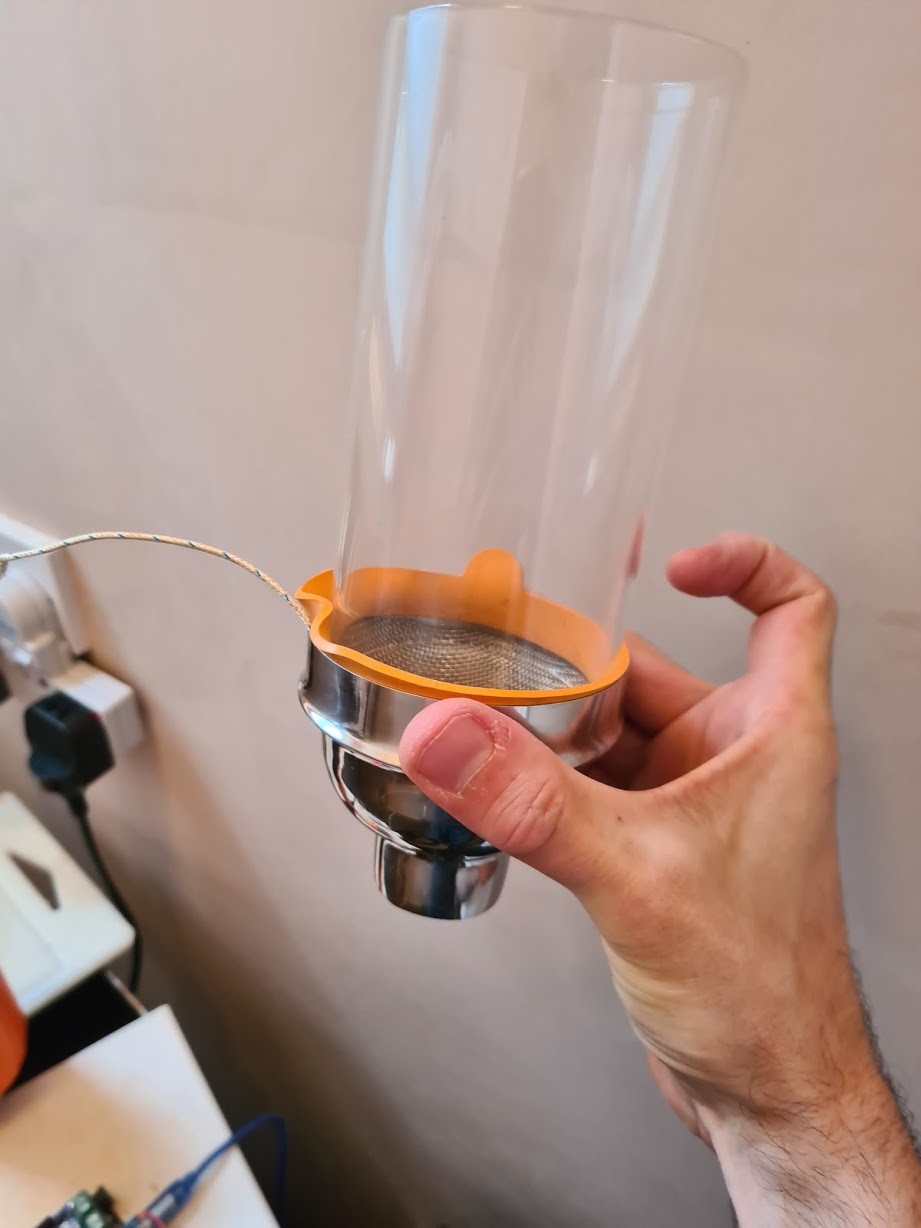
Roasting chamber
The roasting chamber is a cocktail shaker lid + some wire mesh + glass candle holder tube. The original holes in the bottom of the cocktail shaker lid wouldn’t let enough airflow through so I cut them out completely. I pushed in a circle of wire mesh.
The borosilicate glass tube doesn’t fit at all snugy into the cocktail lid, so I used a rubber seal from a kilner jar to wedge it in a bit. I was a bit worried about the the rubber seal not being heat proof, but it doesn’t seem to matter.
Voltage Dimmer / Controller
For manual control I used the same cheap AC voltage dimmer I had previous used for manually controlling the popcorn maker heater. This thing has been so useful I put a plug socket on it to make it easier to connect/disconnect, and earthed the casing.
Thoughts and some stuff I missed
-
The blower is plenty powerful but is a bit loud if I’m honest. Ideally I’d like to figure out a way to make it quieter. Maybe at some point I’ll experiment with an EDF fan or something.
-
I’ve ordered a longer glass chamber (254mm). I think the 75mm width I chose was good, but it would be nice to have the option of roasting a much larger batch - e.g. half kilo and up. The fan and heating element seem to have lots of room for growth.
-
Although I didn’t mention it here, I now have it hooked up to Artisan via an arduino, theromocouple breakout and ssr. Getting a pid driven ROR curve smooth is a mission in itself so will hopefully write some more about this soon
-
I also haven’t written here about the chaff collector. It turns out stainless steel scourers make a really good filter. I ought to post some pictures of that. *Update: posted here *
-
-
Roasting coffee in a Severin Popcorn popper 2
Following on from the previous post, I’ve now made the changes to allow the Severin’s dc motor (fan) to be controlled separately from the ac heater coil. (Basically you snip the circuit after the rectifier and connect your own dc supply to the pins). This means the heater piece and the motor+fan are completely separate.
Along the way I found out a few things about the Severin and thought I’d write it up.
IMPORTANT: There’s a bunch of pictures of extremely dangerous live circuits with cheap equipment here. I have some safeties (RCD plug, rubber gloves, earthed casing on dimmer checked each time), and this is still very dangerous. Please don’t copy anything I’ve done.
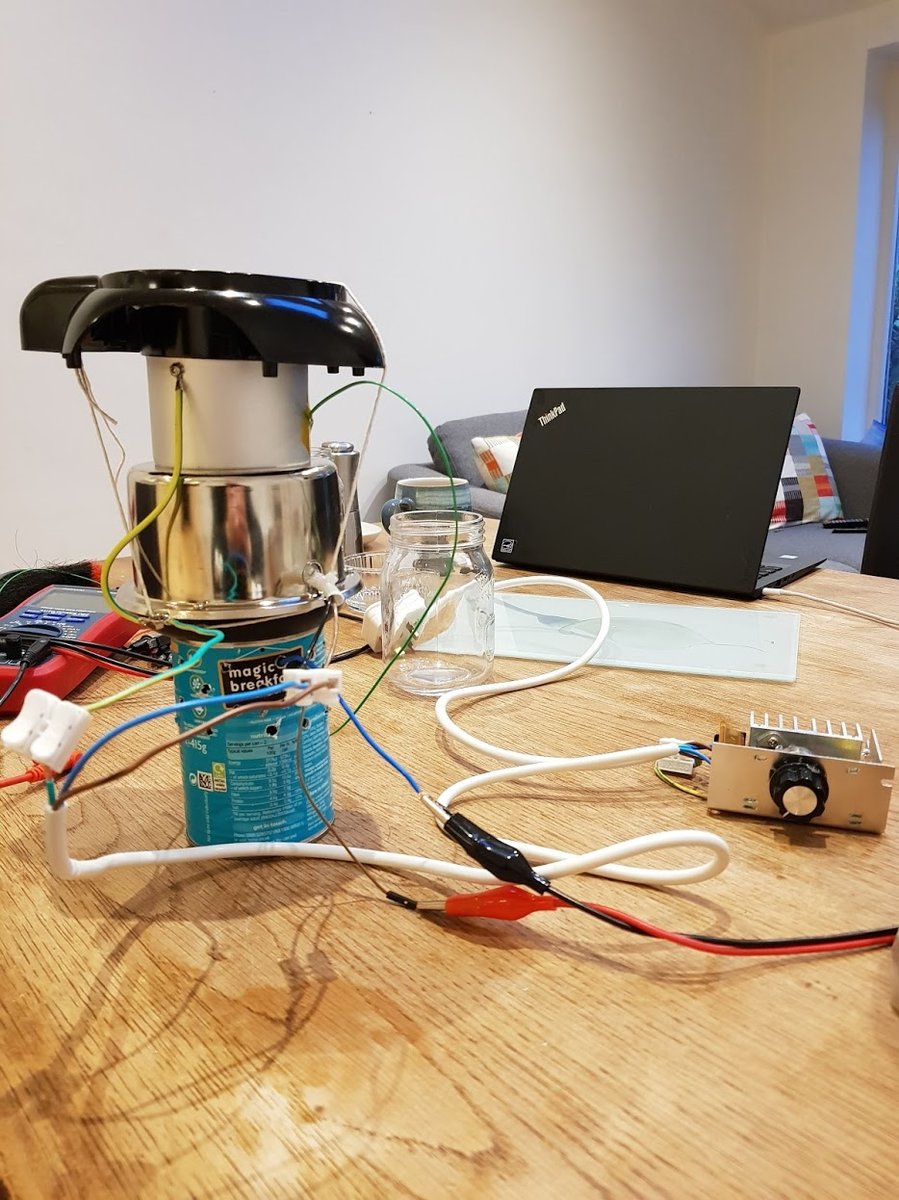
So I basically disconnected all the bits and put it together outside the casing. I did this for ease of fiddling and rustic appeal. I mounted it on a bean tin can full of stones for stability, with some holes drilled for airflow to the fan.
The DC fan motor on a Severin is an RS-385SA-2065R. I think this is rated 18v (see the production description tab on this page)

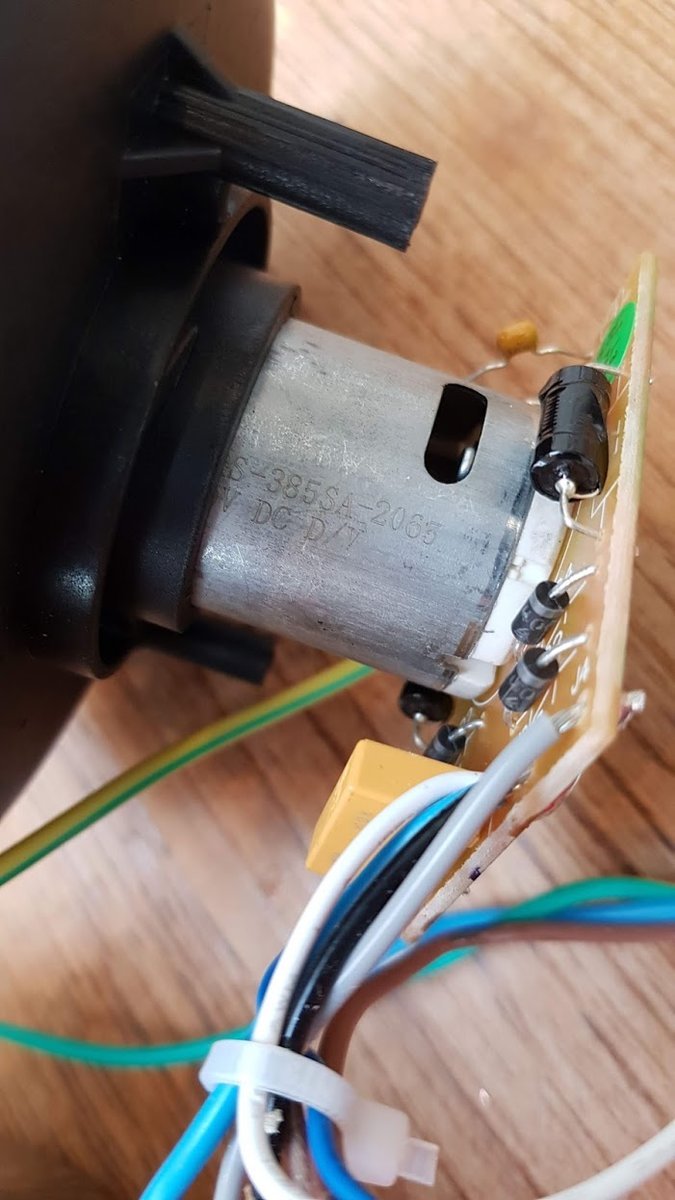
I found I could jack the motor up to 30v (as high as my cheap bench supply goes) where it draws around 3 amps. According to the spec the stall load at 18v is 5.52 amps, so I’m a bit under that. At this voltage it will easily agitate 100g of greens without assistance, and probably quite a bit more. I should do some experimenting to see how high I can take the bean mass.
I should note I don’t have any experience with electric motors - I’m guessing that abusing the voltage like this will cause it to break at some point. Does anybody have opinions/experience of running cheap motors above their rated voltage?
I guess I also might be able to replace the motor with something more powerful.
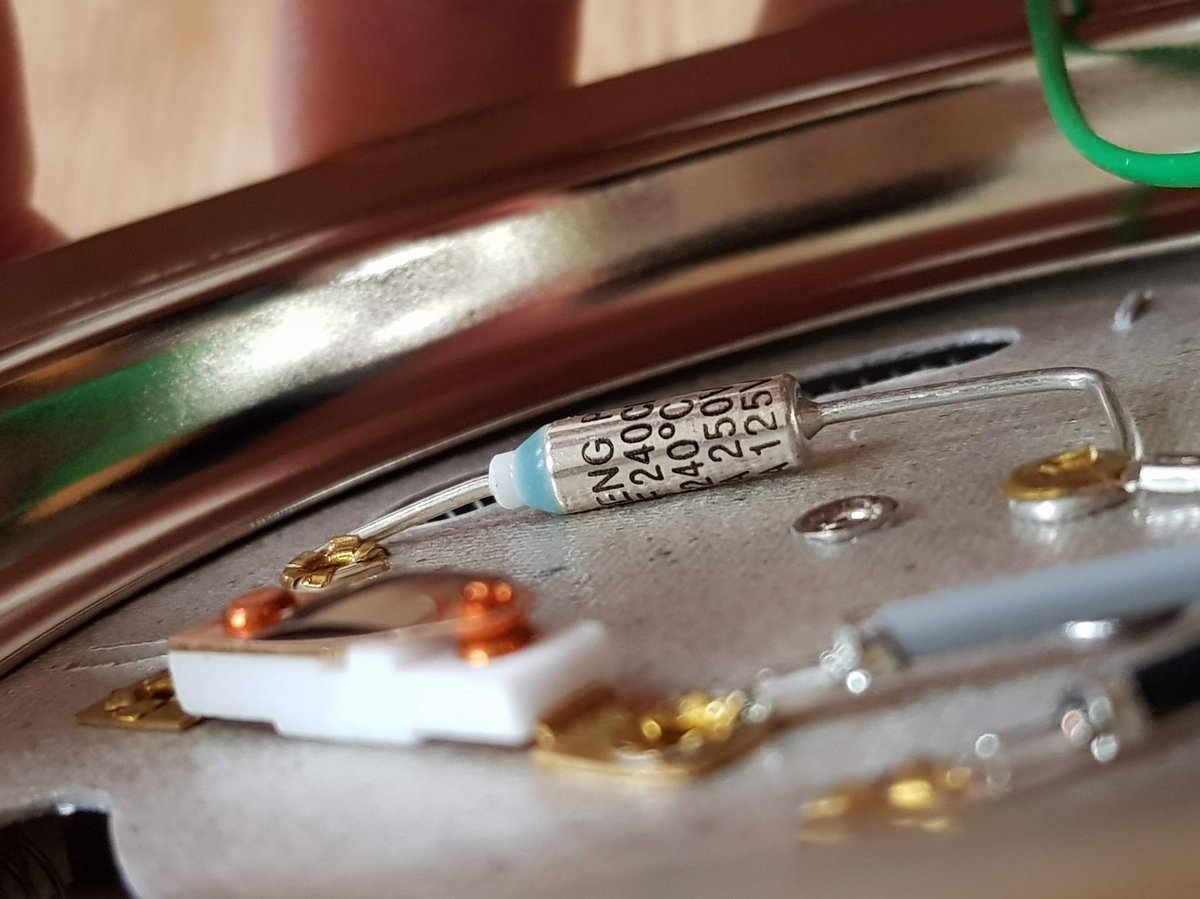
The thermal fuse below the heating element in the Severin is rated for 240 degrees C (and is behind a card heat shield), so I guess that’s why you can use a Severin popper for coffee roasting out of the box without modding it. From reading accounts of other popcorn makers it seems that most have fuses at lower temperatures and these need to be bypassed.
I experimented with connecting the heater wires up to mains AC and found that black + brown cause both heating elements to glow so I snipped the grey wire.
Before:
After snipping the grey wire:
Heating element out of case:
The elements heat up really fast and hot. I only dared to test this for a couple of seconds without the fan (here’s a picture of it at 166v, with the dimmer module from the previous post controlling the ac voltage)

After mounting it on the tin can and checking the grounding, I took the unit outside to roast 100g of Colombia Excelso Huila from Redber.
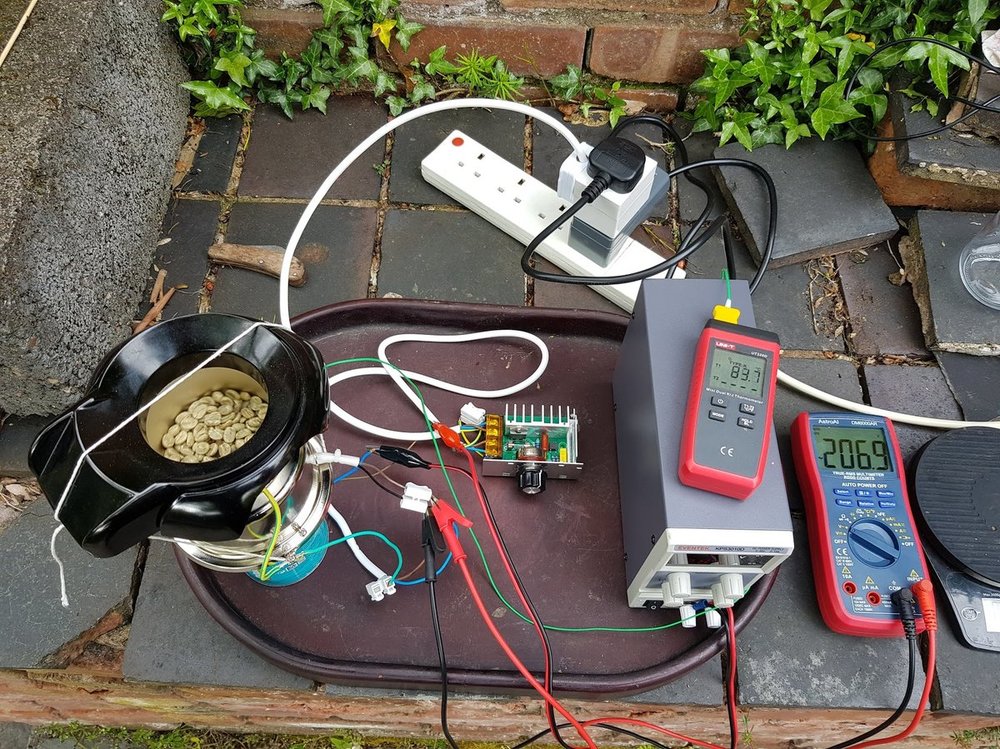
The outside temp was about 9c today and a bit windy. I started with the fan jacked up to 30v/3a for maximum agitation and the heater at 207v. I then increased the temp of the beans by increasing the heater voltage until it maxed out at 237v about 5 mins in. Unfortunately the roast started stalling so with no more heating power I had to reduce the fan motor to increase the bean mass temp. I slowly reduced the fan motor in stages until the end of the roast (fan motor is yellow line/right axis in the chart below, bean mass temp is the blue line). I dumped the beans after reaching 214c at 20 mins.
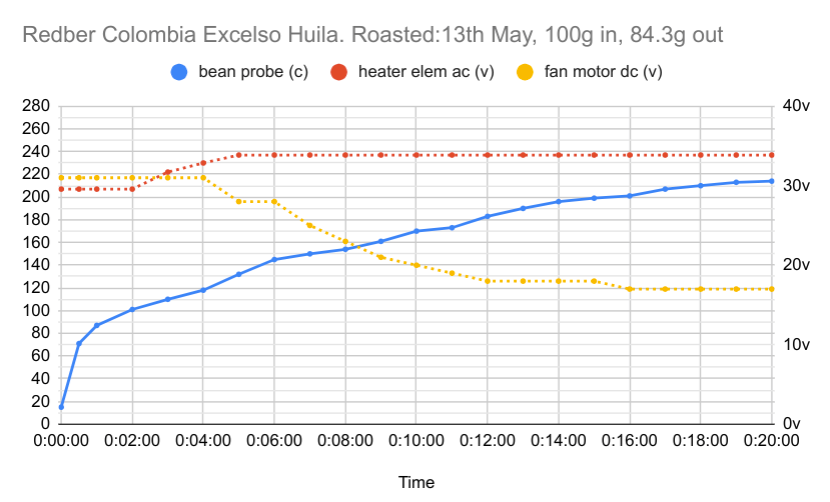
The roast was much more even through all the stages than before, but I was suffering from a lack of heat. The popper in its original state was easily able to take the temp up really high with the fan strong even outside (through 2nd crack into burnt roast territory in ~8 mins), so this is a problem with my rig rather than the popper components. I think the main issue is not having the plastic housing to protect from ambient temperature and wind. I could put this back on, or maybe lag the heater and chamber.
The other option might be to increase the input bean mass. I might try this first since there’s plenty of fan power to move the greens around.
Anyway, here’s a picture of the beans at the end.

-
Roasting coffee in a Severin Popcorn popper
I bought a severin a couple of weeks ago (recommended by a quite a few people on the uk coffeeforums site) for 25 quid to get back into roasting coffee. Unmodded it roasts ok, though very quick. E.g. First crack was somewhere between 3 and 4 mins. At this sort of rate it is pretty uneven and I had to roast to almost 2nd crack to get something that looked consistent.
I found this instructables piece which gives a lot of detail on controlling it with an arduino and TC4+ shield. This is quite a lot of work, but I realised you can do this stuff in stages and get something usable / drinkable at each stage:
- Unmodified popcorn maker, stopwatch, watch for yellow, listen for cracks
- thermocouple in the chamber
- dimmer on the AC lead, simultaneously reduce fan+heat in tandem to slow roasting speed
- separate the DC motor and AC heating element, control manually
- hook up to TC4, artisan, record roasts
- PID control etc
To get to (3) I bought the following which worked out well:
The cheap voltage dimmer is pretty scary. I made sure the casing was grounded, but I’m still using rubber gloves to move the dial! It was worth doing though, I was able to get a roast to stretch out to longer using the dimmer to vary the temperature climb.
Redber Colombia Excelso Huila, 100g green, 84g out Yellowing was about 160c 2 mins in, first crack at 200c 9 mins 30, dumped at 210c 17.5 mins
‘bean’ temp curve:
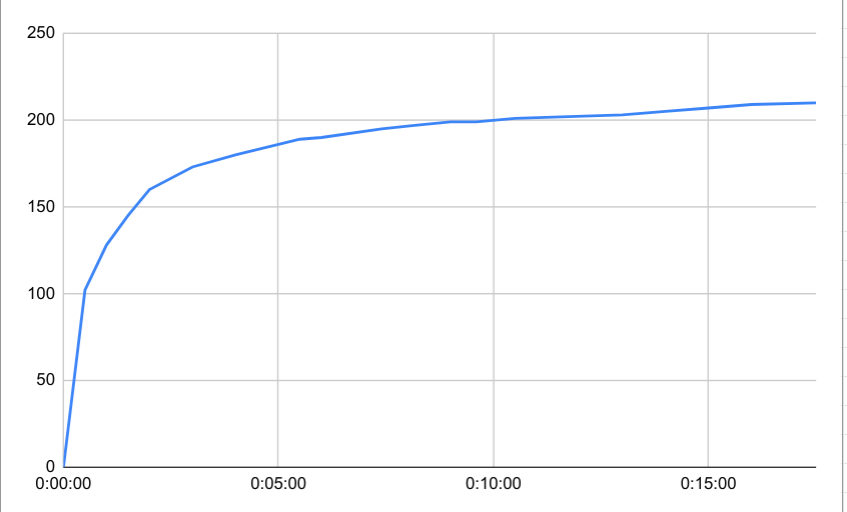
The beans looked quite a bit more even out of first crack than with the unmodded popper. Still a bit uneven in the early stages though.
Next step is to get control of the dc motor and heating element separately. I’m hoping that having the fan up high and the heat low in the early stages will allow for a more even roast.
-
Racer + RLS
On Saturday I had a long chat with Nick C about the Rust Language Server RFC, and about Racer and how it could all fit together. I wanted to write it up here, mainly to get things straight in my head.
After reading the RFC I thought I had a good idea of how it was going to work, but it turned out I was wrong in a number of places and the scope was larger than I had envisaged.
RLS
As I understand the plans correctly, the Rust language server (RLS) will be:
- A compiler - a replacement for the rustc command, for IDEs
- The IDE will use RLS rather than rustc to build software binaries
- RLS will include rustc internally and will also ship with all the rust standard libraries
- The IDE will coordinate actually building the software, and tell RLS what to build (in the same way cargo does for rustc); It could get information from cargo to do this
- A service API for answering low-level semantic queries
- e.g. queries like ‘tell me the fields+methods of <expression>’, ‘which traits are implemented by the type of this expression?’, ‘which call-sites refer to this function?’
- The IDE will then take these lower-level results and build functionality to perform suggestions, searches and refactorings
- A long running process (or a linked library, but long-running)
- RLS will manage an online internal database of semantic information, for a whole project (project is a potentually large collection of crates)
- A crates.io project (or at least that’s the intention). N.B. Building RLS will involve bootstrapping the whole compiler and building the rust libraries, so it will probably also be shipped as binaries in the same way rustc and the stdlibs are.
So in the RLS world the IDE performs both the build coordination, and generates code-completions, suggestions and performs code-transformations (e.g. refactorings). It uses the RLS as a sort of database to retrieve the information it needs to provide these suggestions and transformations. The composition of the RLS API is speculative at the moment.
(N.B. actually all of this is very early and speculative at the moment, so details will likely change in the coming weeks/months as stuff gets built)
Racer + Rustc
I personally hadn’t anticipated that RLS would be used to actually build the rust software. Before the proposal for RLS my intention for racer+rustc was:
-
client would use their current rustc + cargo build tools to build the project
- racer would link to the same version of rustc as the version being used to compile.
- This would allow racer+rustc to reuse the build artifacts from the built project (which are unstable and change between rustc versions)
-
rustc would provide a small library interface (which I’ll call ‘librustc’ here in a hand-wavy way)
-
librustc would have an interface for extracting analysis information at 3 levels of granularity and performance: * Whole crate analysis, taking many seconds to generate per crate * Whole crate ‘skeleton’ analysis, no function bodies, taking ~1 second to generate * Item analysis, taking ~100ms to generate
- The analysis information would be in the dxr ‘save-analysis’ style: - a set of expression spans with reference and type information (record oriented data) - not an ast or a graph
I was intending that the whole-crate analysis would be performed in batch mode on library crates (e.g. from crates.io), and records written to disk. The skeleton analysis would be performed periodically on the currently edited crate as the structure changed, and Item analysis would run continually as you type in response to completion suggestion requests.
Different strokes
The two approaches differ thus:
-
The focus of ‘librustc’ (hand-wavy-edition) is to export the analysis data. It doesn’t provide any indexing or querying
-
The focus of RLS is as a code database. The interface to the outside world is a query interface rather than the analysis data.
-
‘librustc’ (hand-wavy-edition) expects the client (racer in this case, or an ide) to
My main concern with the RLS approach is that it is top-down and big-bang. This is fine, but leaves racer in limbo for a bit. It will be a while before RLS can answer queries that
In an RLS world, racer’s role (as the ide interface for editors) changes a little: - It needs to coordinate builds - It performs completion queries by generating
- A compiler - a replacement for the rustc command, for IDEs
-
Racer progress update
Racer progress has been a bit slow of late, mainly because the implementation is at a crossroads and I wasn’t sure how things would pan out with the IDE tools RFC. Racer 1.1.0 was released yesterday, so I thought it was time for an update
A bunch of Racer-related things happened in the last few months:
-
Nick Cameron authored an rfc exploring some ideas about adding Rust support for IDEs
-
I wrote some code to explore using Rustc for type inference and completions.
-
@jwilm started work on a YCM backend for rust using Racer. As part of this he created ‘Racerd’, a Racer daemon.
-
The Racer emacs plugin and vim plugin got split into their own github projects
-
Some awesome people contributed bugfixes, performance improvements and features to Racer
Contributors
Thanks to everybody that contributed code and patches since the v1.0 version:
Antoine Kalmbach, Bjørnar Grip Fjær, bluss, Chris Tetreault, Christopher Serr, David Harks, Fredrik Bergroth, Georg Brandl, Ivan Fraixedes, Ivo Wetzel, Jake Goulding, Jakko Sikkar, Jędrzej, João Felipe Santos, Joe Wilm, Kevin K, LFalch, Loïc Damien, Marcell Pardavi, Matt Wismer, Shougo Matsushita, Syohei YOSHIDA, Jonesey13, Vadim Chugunov, Wilfred Hughes, Yamakaky
@jwilm and @birkenfeld deserve a special mention: @birkenfeld for overhauling the source loading/caching and making things considerably faster, and @jwilm for putting in a bunch of work to get Racer working as part of a long running process/daemon.
Racer and the ide tools RFC
The gyst of the ide tools rfc proposal was to create a daemon that would manage the resolution and type information generated by the compiler. It would then present an interface for IDEs to perform queries about the code being written, similar in style to Go’s ‘oracle’ tool.
The idea was that the compiler would generate this information as a separate step, and then the oracle would load, cache and serve this information. The approach is well suited to finished crates, where Rustc can generate a complete static model of the code. It is less straightforward to see how this model should tackle unfinished code in the midst of being written. The idea was that there would be a separate ‘quick-check’ compilation phase, which would generate incremental (partial) information for the oracle to load.
The challenge with a Rustc quick-check compilation is that it would need to be invoked frequently (maybe on each keypress), and be fast enough to provide information required for completions at ide-speeds (in the 100-200ms ballpark). In addition it would also need to be able to cope with unfinished and incomplete code. Rustc isn’t currently designed with these requirements in mind.
I spent some of my spare time prototyping a Rustc typechecker to figure out if we could maybe make Rustc fast enough for quick-check to be feasible. Over this period I learned a bunch about the compiler and I feel I am quite close to having something workable. Initially I was planning to replace Racer’s internal type checking machinery with this code, but unfortunately there are a number of things that make this difficult to roll out.
Basically, despite its flaws, Racer has the following desirable properties that a Rustc based completer would lack:
- Racer doesn’t share internal binary data with Rustc, and so doesn’t need to target a specific version of the compiler
- Racer has low expectations about its input, and happily attempts to complete broken and unfinished code
- Racer works across crates and on sourcecode that hasn’t been compiled.
Replacing Racer’s internal inference machinery with a Rustc based engine would degrade Racer’s current capability in a number of areas and make it much more brittle wrt source code input:
- There would need to a be a Racer version targeted at each version of Rustc (stable, beta, nightlies). Users would need to be savvy enough to download the version that matched their compiler and would need to upgrade their Rustc version if they wanted to pick up new Racer features.
- Users would need to run a precompile step on every crate they wanted to navigate through, to generate the appropriate dependency compile artifacts (rlibs). They’d need to re-run this step whenever they upgraded rust + Racer.
- Racer would fail whenever there was an error that Rustc couldn’t handle. Over time I hope we could get better at this, but at least initially we’d need to come up with ways to educate users on how to keep their code in a shape that could be analysed.
Despite this I still remain convinced that a Rustc Racer is the way to go. (The alternative would be to build out Racer’s type inference to mirror Rustc’s. No small effort!)
I think the best approach in the short term is to use Rustc to augment Racer’s existing functionality and type inference machinery rather than replace it. My plan is to build a separate Rustc based typeck daemon that Racer could invoke to perform additional type checking when its own machinery fails.
This daemon will need to be an optional plugin for Racer since compiling it will be onerous, at least initially while we figure out the best way to package Rustc targeted code. Hopefully this will help us gain experience packaging and using Rustc’s internals in an interactive environment.
-
-
rustc typeck timings
(Following up on my comment on the rust IDE rfc)
Here are some performance numbers for a type inference prototype (demoed here), which uses the rustc libraries to generate resolution and type inference information. It runs from scratch against the source code and rlibs with nothing pre-indexed/loaded, and prints the type of the expression highlighted by the cursor.
As I mentioned in the comment, it speeds up the parsing and analysis stages by selectively stripping function bodies as the text is loaded by rustc, replacing them with whitespace and newlines so that the coordinates are the same. I cribbed the code to do this from racer, which has some fast routines for iterating over logical blocks of rust source.
As a target I analysed the rustc_typeck crate.
On my laptop (2ghz x64 ubuntu):
- Phase 1 (parse input): ~50ms (includes stripping the function body text prior to ast parsing)
- Phase 2 (expand) : ~132ms
- Phase 3 all other checks expect body typeck: ~390ms
- Body typeck for single function: - ~19ms
The results suggest to me in this environment we could get a type-signature level index of this crate achieved in ~ half a second, and then perform the body typecheck on the current local scope after each keypress. We would then need to perform an additional step using the type-signature index to deduce the completion results.
The steps for a type-based completion query ( e.g.
foo.<caret>) are:- deduce the type of the expression to be completed (i.e. the stuff before the dot)
- generate suggestions by resolving the type and finding e.g. methods, fields, trait impls
Regardless of the level of prior cached indexing, we potentially need to perform the type step (1) on each keypress. This means we should aim to get rustc answering this question in < 100ms (hopefully much less). I suspect this will require some custom compiler work in addition to the current incremental compilation effort.
We could theoretically do (2) without an index directly from the sourcecode and rlibs, (racer currently attempts to do this from source). However this is complicated especially in the face of macros. A rustc generated index would make this simpler and faster, and the index only needs to be at the type-signature level to perform this specific query (i.e. we don’t need information about the contents of functions except for the local scope we are currently searching from).
With the field search occurring outside of rustc we can also be more relaxed about consistency and versioning - e.g. we could perform the search on an old index if we don’t have the most up-to-date one generated yet, since updates outside the current scope will be limited.
-
Videos! Racer + Rustc + Typecking
I’ve been providing some feedback on an RFC Nick Cameron is writing about providing rust compiler support for IDEs. In order to gain some understanding I’ve been experimenting with a prototype tool to perform type analysis on a crate as fast as possible (as you type).
I wanted to demo this tool and racer to Nick, but unfortunately getting experimental code to compile with rustc is error-prone due to rustc being a fast-moving target. Instead I made a couple of videos to show Nick what I was up to. I thought they might be interesting to other people so with his permission I’m posting them here:
-
https://www.youtube.com/watch?v=3-f67VHGgVs (~10 mins)
(I’m not very good at speaking on videos so these are a bit mumbly, sorry!)
As I see them, the big upcoming challenges from the perspective of code completion are:
- Creating a useful stable interface to rustc that can be used to extract semantic type and lifetime information
- Performing rustc analysis on incomplete crates (so that the results can be used for providing completions + suggestions as you type)
- Performing the (incremental) analysis with sub-100ms latencies
I’m very excited about the prospect of rustc-enabled perfect completions, and am also eager to work on other functionality for racer (I use intellij daily at work and really miss the ‘extract-method’ refactoring when writing rust code).
-
-
Racer v1.0.0!
I made a Racer v1.0.0 release!
This doesn’t represent any particular milestone in Racer’s development, but rather I wanted to draw a line in the sand before Racer embarks on future architectural changes. A bunch of people have made editor + ide plugins that rely on Racer’s under-specified output protocol and so having a release to point at will help a bit with plugin compatibility. I am planning to stick to semver versioning so it is likely there will be a v1.0.1 soon!
For the future I would like to see Racer mature into a fully fledged library and binary for supporting IDE authors. In addition to better completions, Racer has potentual to provide support for dynamic type-checking, code assistance and refactoring. To deliver this functionality Racer will need to work much closer with rustc and, due to the overheads in running queries through the compiler infrastructure, will likely need to operate as a long running process/library, holding state and caching information. Unfortunately it is also likely that future Racer versions may only build with rust-nightly due to a tighter coupling with unstable rustc internals.
Racer is an evening/weekends spare time project for me, and I am very grateful to everyone who helped out submitting patches, bugfixes and suggestions over the last year. In particular, thanks to:
Andrew Andkjar, Antoine Kalmbach, awdavies, Ben Batha, Björn Steinbrink, Björn Zeutzheim, byronyi, Chris Morgan, Corey Farwell, Dabo Ross, Damien R, Darin Morrison, Derek Chiang (Enchi Jiang), Eike Hein, Emil Lauridsen, Henrik Johansson, Heorhi Valakhanovich, inrustwetrust, Jake Kerr, Jakko Sikkar, Johann Tuffe, Jorge Aparicio, Justin Harper, Keiichiro Ui, Kirill Khazan, krzat, Leonids Maslovs, lilydjwg, Marius, Marvel Mathew, mathieu _alkama_ m, Mattias Bengtsson, Michael Gehring, Michael Maurizi, nlordell, oakes, Pyry Kontio, Renato Zannon, rhysd, Ricardo Martins, Ronald Kinard, rsw0x, Saurabh Rawat, Sebastian Thiel, Shougo Matsushita, Siddharth Bhat, Tamir Duberstein, Tom Jakubowski, Victor-Nicolae Savu, Vincent Huang, Vlad Svoka, Wilfred Hughes, Yamakaky, yasushi abe, Zbigniew Siciarz, Ziad Hatahet
subscribe via RSS